
Loading...
Loading...
Loading...
Loading...
Loading...
Loading...
Loading...
Loading...
Loading...
Loading...
Loading...
Loading...
Loading...
Loading...
Loading...
Loading...
Loading...
Loading...
Loading...
Loading...
Loading...
Loading...
Loading...
Loading...
Loading...
Loading...
Loading...
Loading...
Loading...
Loading...
Loading...
Loading...
Loading...
Loading...
Loading...
Loading...
Loading...
Loading...
Loading...
Loading...
Loading...
Loading...
Loading...
Loading...
Loading...
Loading...
Loading...
Loading...
Loading...
Loading...
Loading...
Loading...
Loading...
Loading...
Loading...
Loading...
Loading...
Loading...
Loading...
Loading...
Loading...
Loading...
Loading...
Loading...
Loading...
Loading...
Loading...
Loading...
Loading...
Loading...
Loading...
Loading...
Loading...
Loading...
Loading...
Loading...
Loading...
Loading...
Loading...
Loading...
Loading...
Loading...
Loading...
Loading...
Loading...
Loading...
Loading...
Loading...
Loading...
Loading...
Loading...
Loading...
Loading...
Loading...
Loading...
Get in touch with our Support team
If you have any issues, our support team is here to help. You can reach us through multiple communication channels:
Email: [email protected]
Use the Chat bubble in the right bottom corner when visiting Suptask Web App
Learn how to invite the Suptask App in Slack
Suptask can be required to be invited to channels and groups in Slack in order to use certain ticket submission methods, such as using the ticket 🎫 (:ticket:) reaction emoji.
In the desired channel or group where you want to invite the Suptask App in Slack, use a slash command message:
/invite @Suptask
In such a case when ticket submission is not working, try to invite the Suptask App.
In Direct Messages (DM) might need to grant explicit permissions.
Watch videos to learn more about Suptask
How to submit and manage your support requests with Suptask
This guide is for you who are a part of a Slack Connect / External Connection channel in Slack where you are provided with customer support using Suptask
You will get help as a user to get started using Suptask to submit support requests, overview your tickets and reply on your tickets.
You will also get an understanding on how to get the most out of Suptask with best practices to optimize your experience with Suptask. wdq
Suptask is an innovative ticketing system that transforms how teams handle support requests. By integrating natively with Slack, Suptask allows you to create, manage, and resolve tickets without leaving Slack.
Whether it's internal IT issue, HR inquiry or external customer request, Suptask ensures that every ticket is tracked, organized, and addressed promptly.
The Slack permissions scope that the Suptask app is making use of
Suptask is making use of different permissions within your Slack workspace in order to provide the features it comes with. Slack have standardized the permissions an application like Suptask can make use of. Therefor it is Slack itself who explains and summarizes the permissions that are asked for when your user is being authorized.
Suptask uses messages and message threads inside of channels to support its unique ticketing system. Suptask do not store any Slack messages, we are rather referencing these into Slack.
Suptask can only access the messages in a channel where the Suptask App is invited to explicitly, including public channels.
Here follows a summary of the common permissions that Suptask is using:
Basic information about channels - Used to list channels and present channel names when configuring a Ticket Form.
Basic information about users in the channel(s) - Name and ID of the users in the channels where Suptask App is invited to.
Message access - Read messages that are sent in as tickets to Suptask in the channel(s) where the Suptask App is invited to.
Send messages - Send messages to users that are using Suptask.
Shortcut & Workflows - Enable shortcuts to create tickets from messages and have Suptask available in the Slack Workflow builder.
Extended permissions are optional and can be used to create tickets using the ticket emoji in Direct Messages (DM).
Depending on how Suptask have been configured, it will either allow creating tickets automatically or manually from the messages sent in the channel.
Here is how you can submit a ticket manually by adding the 🎫 ticket emoji as a reaction on top of your message:
All your submitted tickets can be found in the Suptask App. You can find and track all the active tickets that you have submitted from here
Replies can easily be sent on your tickets by:
Opening the message in the shared Slack channel and sending the reply within ticket message thread.
Opening the ticket from the Suptask App and sending the reply on the ticket message thread.
Suptask replaces or complements a traditional ticketing systems, empowering your users with a superb experience as they can submit and track tickets seamlessly, without having to leave Slack.
You will achieve improved user satisfaction rates with Suptask compared to using other traditional systems outside of Slack:
Centralized in Slack Handle all tickets within Slack, eliminating the need to switch between different platforms.
Enhanced Collaboration Work together with your team on resolving tickets using Slack's familiar interface.
Improved Response Times Receive Slack-native notifications and updates on tickets to ensure timely resolutions.
The best in class User Experience Your users will love how easily it is to submit tickets without having to leave their daily work.
Suptask integrates directly into your Slack workspace, allowing you to interact with it just like any other Slack feature. There's no need for additional software or complex setups.
Suptask uses Slack Channels, Messages and Message threads to establish a fully fledged ticket system within your Slack workspace. Giving your users the ability to submit, manage and respond on tickets.
Install the Suptask app in your Slack workspace
Suptask will help you install and setup your account with a guided onboarding wizard:
Many workspaces require a user who have the Slack Workspace Admin role as a minimum in order to install new Slack apps to the workspace.
Proceed with the installation as on how to install Suptask.
There are a few alternatives for you if you do not have a Slack Admin role on your Slack user:
Request to get the Slack Admin role temporary during the installation.
Ask the Slack Admin within your company to install Suptask for you. See the instructions below on how to install Suptask.
Your company may allow you to request to install a new Slack app
In some cases a user without the Admin role can request to install a new Slack App, such as Suptask.
Suptask provides a Web App that will automatically install the Suptask App in your Slack workspace.
Open the
Proceed to login with your Slack account
Make sure to login with the correct workspace. You can toggle this in the upper right corner.
Confirm and grant the permissions required for Suptask to be installed.
Approving for the complete Slack workspace can sometimes be required. Head over to the in the Slack Admin interface and confirm it is Approved for the Workspace.
If you are both installing Suptask, as well as also managing and configuring it, then proceed to the next step with the setup of Suptask:
Sometimes there is a Slack Admin user who installs Suptask, and then delegates the rest of the setup to another user.
Suptask allow you to do this by having one user to install Suptask and another user to to finalize the rest of the setup.
Proceed to install Suptask
As the installation is completed, proceed to .
This will enable them to manage all parts of Suptask themselves.
Make sure this other user have tried to login to at least once.
Before you begin, ask the user you want to promote, to make a login attempt to the with his Slack workspace user.
This will automatically record his Slack user within Suptask, allowing you to promote it from the list of users.
You can now proceed to in the Suptask Web App
The user should be visible in the list of users
Proceed with the in the Suptask Web App to finalize the initial the setup of Suptask.
A guide to get started with Suptask as a User who submits tickets
This guide will help you as a user to understand the basics of submitting tickets, as well as overviewing, tracking and replying on tickets. You will also get an understanding on how to get the most out of Suptask with best practices to optimize your experience with Suptask.
To dive into the details, follow this guide with examples and videos on How to submit a ticket:
Once your tickets are submitted, you can easily track their progress directly in Slack including the current status and progress. Suptask offers an overview feature that lists all active and past tickets, making your simple.
For further instructions on managing and viewing your tickets:
Replying to tickets is done through Slack’s own message threads.
Open the corresponding ticket message thread and post your message. Suptask automatically record your replies and keeps the ticket up to date.
Any reply from the Agent on a ticket will also appear directly in the ticket thread.
Learn how to manage and respond to tickets
When a ticket has been submitted, it will receive a unique ticket ID that can be tracked by both the user who requested the ticket, as well as the Agent who receive the ticket in the Inbox where it can be managed.
Both users and Agents can easily reply on any of their tickets directly from Slack.
Set up a new Inbox, which will automatically be created as the next generation inbox version.
Open your legacy inbox and assign each connected form to the new inbox. Use the "Assign form to inbox" to transition the form to the new inbox.
Your new inbox is now ready with your current forms.
Make sure all your tickets are Closed before migrating. Otherwise tickets might not work properly when trying to update them after the migration.
Install Suptask
Start by installing Suptask in your Slack workspace
How to submit tickets
Learn how users can submit tickets in Slack
Videos
Discover our video library
Receive tickets via Email into Slack with Suptask
Track your performance KPIs in accordance to your Service Level Agreement (SLA)
How to integrate with popular systems
In such a case, an Admin will receive a notification about the installation which he will need to grant before you can continue.
This will work in the installation wizard in the Suptask Web App, but you might need to confirm the installation and permissions of Suptask multiple times.
This is often asked for twice, in order to confirm the permissions for the user and workspace
The installation wizard will provide you with feedback when Suptask is successfully installed.
You can also verify that Suptask is installed by searching for Suptask in your Slack workspace.
If the user is not listed, make sure to confirm that step 1 have been performed correctly.
Promote the user by enabling the Account admin role on the user.
The user is now a Suptask Account Admin and can manage all parts of Suptask.


Watch how an Agent can manage, assign and reply on a ticket.
Every user who submits a ticket will be able to track and overview them, including adding additional replies to the tickets.
Tickets can easily be managed from the Suptask App in Slack, or with Tickets view on the Web.
Every Agent can manage and overview the tickets that he have access to via the Inboxes that he is a part of.
Tickets can easily be managed from the Suptask App in Slack, or with Tickets view on the Web.
Agents can quickly Close tickets by adding the ✅ checkmark reaction emoji on the Ticket, which will automatically Close it.


Frequently Asked Questions and Common Issues
Search for "Suptask" in Slack and you should find the App if it is installed.
You can make sure to always have Suptask visible in the left side menu on Slack by adding it as a favorite.
You can overview all users who have the Agent role in on your account.
Users will automatically become Agents by inviting them to the Responder channel in Slack, which is connected to your Inbox.
Have the user rejoin the Responder channel that is connected to the Inbox, that will initiate the recalculation process of identifying Agents which can help to promote the users to Agents.
If the user is missing the Inbox from Suptask Web, make sure the user has the Account Admin role in order for them to be able to manage the Inbox and Forms.
Inboxes can also be reloaded in order to fetch the most up-to-date information from Slack. This can be done from the page:
This could be due to an invalid personal token. Try to renew it for your user by visiting the link below:
Slack Users
Visit the user profile in Slack by pressing on their name
Click on More options (the three dots icon button)
From there you can copy their member ID:
Slack App
Visit the App in Slack from the left menu
Click on the App name
From there you can copy the member ID
You can link directly to the Suptask App from a website using the following URL, where the team parameter needs to be replaced with your own team ID in Slack.
Learn how to use the Organization field
The Organization field can optionally be added to a Form and be visible to the users who submits a ticket.
The Organization field is available as a standard analytical field on the Dashboard, making it easy to track as a part of your statistics and KPIs. It is also visible on all ticket views in Slack and on the Web, as well as a filtering option.
The Organization field is a multi-purpose field that can help you with:
Tracking from what end-customer the ticket origins from.
Tracking from what department the ticket origins
Tracking from what team the ticket origins
The Organization field can be changed from a single-line text field to a single-selection field. This enables you to manage the values which can be selected, maintaining consistency across submitted tickets.
To change the Organization field:
Open
Edit the Organization field
Change the Field type
Add the values of your choice to the Organization field.
Customer Support submits tickets to the Product & Engineering teams, where the Organization field is used to record the company name of the end-customer impacted.
Follow this guide to get started as an Agent in Suptask
How to onboard users and rollout Suptask to your organization
As you get closer to finialize your setup of Suptask, the next step will be to prepare the rollout of Suptask and onboarding of your users.
In this article we provide helpful content and guides on how to make a successful rollout.
Use the checklist to confirm that everything is ready to rollout Suptask to your organization and start onboarding users.
Understand the fundamentals of Suptask
Suptask consists of many different parts that makes up the ticketing system on Slack.
Below you can learn more on what they are and how they play their role in Suptask.
Get started with your first Inbox and Form
The foundation of Suptask consists of Inboxes and Forms, empowering you to set up any kind of ticketing routing that you might need.
Ticket creation with Suptask can support a number of different teams and use cases, for example:
Submit an IT issue in the channel #it-helpdesk to the IT team.
Have your employees send a request to the IT or HR team.
Submit on behalf of users and handoff the ticket creation
Tickets can be submitted on behalf of another user, by applying a different Requester then yourself when you create the ticket. In combination with the handoff feature, Agents can easily create tickets efficiently for all sorts of requests.
You can create a ticket on behalf of another user, by changing the requester of the ticket before it is submitted. This is available from the Create a ticket dialogue.
When you as an Agent create a ticket from another User's message, it can automatically set the message author as the default Requester of a ticket.
Learn how to send automatic CSAT surveys to users
Customer Satisfaction Score (CSAT) is a widely used metric to measure how satisfied customers & users are with a product, service, or support. It is typically gathered through survey asking respondents to rate their satisfaction after the interaction is completed
The CSAT satisfaction score is often used as a metric or a KPI which can be reported on regularly.
Connect Suptask across Slack multiple workspaces
Organizations can sometimes have multiple Slack workspaces without making use of Slack Enterprise Grid.
Suptask offers a unique solution that allow you to connect the complete workspaces together, without Slack Connect.
This can be an internal organization with multiple workspaces, or a workspace where you require to connect to several other external workspaces.
Learn how to Delete and Archive tickets
Track performance across your team and agents
Suptask will help you keep a track of your team's performance by collecting metrics of different actions that are done on tickets.
This enables you to review and analyze:
Performance for a specific Inbox
Responsiveness of a team of Agents, or a specific Agent
How fast your users are receiving help
Learn how to use approvals in Suptask
Approvals can easily be handled within your tickets, empowering you to request approvals from any person within your organization.
Approvals extends the capabilities in your Suptask ticketing system, making it possible to cover additional use cases within your daily work which requires approvals from outside your team of agents.
Learn how to search for tickets in Slack
How integrations are billed to your account
Suptask applies a flexible billing model for integrations where integrations can be added to your account independently of your subscribed plan.
Embedded into the price of an Agent
Added on top of your monthly Agent bill
Integrations is priced per configured integration on your account.
When added on top of your monthly bill, the price per integration starts at $20 per month.
Suptask is tracking a set of default metrics out of the box:
Time to Resolution = Total elapsed time from creation to closure of the ticket
Time to First Reply = The time from when a ticket was opened, until when the first reply from an Agent is sent (either from the Responder channel or from the Requester channel).
These are available on tickets and in the collected statistics, with visibility on the Dashboard and in the CSV Report.
Extended Performance Metrics is available in the Custom plan and might come with an additional cost.
Suptask is built to track all aspects of your ticketing, helping you to understand different dimensions of the performance of ticket interactions.
These extended metrics can be enabled per Inbox in order to be tracked:
Actual Time to Resolution: The actual resolution time that excludes selected statuses and business off-hours time. This requires Agent Business Hours to be configured.
Number of reopens: Track the number of reopens on tickets.
First assigned: Track when a ticket is first assigned
Number of reassignments: Track the number of reassignments that occurs on tickets.
SLA Breaches: Times when a ticket is breached towards the defined SLA thresholds.
Custom Resolution Tracking is available in the Custom plan and might come with an additional cost.
Suptask allows you to customize how your are tracking performance metrics, such as the Time to Resolution.
By defining what ticket statuses you want to include or exclude from the time, you can achieve a custom calculated performance metric that is aligned according to your needs.
Open - Excluded
Assigned - Included, start to calculate from when the ticket is Assigned.
In-Progress - Included
Escalated - Included
Waiting for customer - Excluded, stop calculating when the ticket is waiting for the customer.
Closed - Stop calculation.
In Slack, set up a Workflow Builder in a public or private Channel A.
Include a button (or shortcut) that triggers a form prompting users for details (e.g., issue description).
Once submitted, the form posts the content as a message into a private Channel B.
This hides the identity of the user by design.
Channel B should be restricted so only agents or admins see the content.
Users of Channel B will not know who initiated the request—only the text from Channel A is visible.
Configure Suptask with an Inbox and a Form designed for automatic ticket creation.
Enable Auto Creation from new messages in Slack Channels for Channel B by selecting the special Form type Auto Creation of Tickets in Slack Channels
Every message posted into Channel B (regardless of sender identity) triggers Suptask to create a ticket, using the message content as the ticket description. No user name or identity is captured.
End‑users submit through Channel A.
Channel B receives the anonymized message.
Suptask automatically creates a ticket using that content.
Agents handle tickets via Suptask - not exposed to requester identity.
Contact Suptask Support or your Account Manager for more information.
Ticket is the definition of a request that has been submitted by a user and received in an Inbox where it has been created with a unique Ticket ID.


How to adopt ticketing to your local languages
Suptask can be available for your end-users in their own local language, making it easy with a great experience for everyone to submit a ticket.
Suptask will automatically adopt the user interface to the end-user locale, making sure the correct language is used. This allows you to scale the ticketing globally across continents, while keeping your ticketing system regional.
The support languages include all major languages that are currently supported by Slack:
English
German
Italian
Spanish
French
Portuguese
Japanese
Chinese
Korean
Begin your journey by setting up a new Inbox. Inboxes help you to group tickets to a team of Agents who get access to tickets.
You can configure several features on your Inbox:
... and much more. Learn more by visting the Inboxes section below:
You can have multiple Forms in your Inbox, enabling you to categorize the different ticket requests that you receive to your Inbox.
Users will be able to select among the Forms when they submit the tickets.
To dive into the details, follow this guide with examples and videos on How to submit a ticket:
Learn how to efficiently manage tickets and provide timely responses to users.
Manage user roles and permissions to control access levels within your team.
You can restrict access to Inboxes for your Agents. Learn more how to Manage access to your Inbox
Keep track of all your tickets and monitor their progress effectively.
Utilize Suptask's analytics features to gain insights into your ticket management performance.
Manage approvals within tickets
Make use of the built in Approval feature that allow you to request Approvals within ticket requests.
Set up automatic CSAT surveys in your Inbox to allow measuring how satisfied our users and customers are.
Discover additional features in Suptask that can help you to elevate your ticketing management and experience:
Automatic summary of your tickets from Suptask AI Assistant help you build knowledge which helps you overview the problem and solution of tickets, as well as having the knowledge searchable across Slack.
Are you receiving recurring questions that you need to manually reply on everytime? Make use of Canned Replies where you can create predefined templated answers that you can reply with, just 2-clicks away.
You can add users outside of your Inbox to follow and comment on a ticket using the Followers feature.
Inboxes are created and configured
Here follows an example message from the IT team when introducing users to Suptask:
Introducing Suptask - Our New Ticketing System in Slack!
Hey everyone
We've now set up Suptask in Slack to handle your IT support requests and hardware orders more efficiently, reducing response times and improving the overall ticket user experience.
How to get started:
Go to Apps in Slack and search for Suptask
Open the Suptask app in Slack to create a ticket. You can also use the
/suptaskcommand if you prefer.Track updates in the Activity section or directly in the Suptask app.
Star the Suptask app in Slack for easy access. This will help keep everything more organized and ensure you never miss an update on your tickets.
Since this is our initial rollout, I'd love your feedback! Please feel free to reach out with any of your ideas or feedback, or if you need any assistance. '
You can find these helpful to manage your notifications and search for tickets.
Here follows an example announcement to client and customers when a company introduces Suptask as their support ticketing system.
Hey everyone,
We’re excited to announce that we've integrated Suptask into our Slack workspace to enhance our customer support experience. This integration allows for more efficient handling of your inquiries, leading to quicker responses and improved communication.
How to Get Started:
Submit a Ticket:
Via Slack: In our shared Slack channel, use the Suptask app to create a new ticket. You can do this by adding the 🎫 reaction emoji to any message to convert it into a ticket.
Via Email: Alternatively, you can send your support requests to . These emails will automatically generate tickets in our system, and you'll receive confirmation along with a ticket number for tracking.
Track Your Tickets:
Suptask App in Slack: Access the Suptask app from the left-side menu in Slack to view and manage your tickets. This provides a centralized location to monitor the status and updates of your inquiries.
Channel Notifications: Stay informed with updates directly within the Slack channel where the ticket was created.
Stay Organized:
Star the Suptask App: For quick access, star the Suptask app in Slack. This ensures you can easily navigate to your tickets and stay updated on their progress.
As we roll out this new system, your feedback is invaluable. Please share any thoughts or suggestions to help us improve your support experience. If you have any questions or need assistance with Suptask, feel free to reach out.
Thank you for your cooperation and for helping us enhance our support
We have collected a number of videos that you can share in order to share additional training to users.
These best practices help you shape your setup and workflow for the most optimized ticket process.
Suptask have a number of useful features that supports both users and Agents in their daily work.
These are all helpful to share to your users and Agents during the introduction.
Summary notifications
Every user can customize the summary notifications from Suptask, to be disabled completely or to be shared just once a week. By default it shares only active tickets with daily notifications.
Create tickets faster using the ticket emoji, this can help both user and Agents to have quick access to the ticket reaction emoji in their Slack client.
Make the Suptask app visible at all times in Slack by starring / favorizing it in Slack.
Submit tickets from a group chat in Slack.
Receive email requests and reply via Slack.
Submit internal service orders from the mobile Slack client using Suptask App Home.
Receive customer support requests from a Slack Connect channel.
Inboxes and Forms works as top-categories and sub-categories when your users will submit a ticket.
This allow you to set up a journey where users can select:
What Inbox to submit tickets to
And within that Inbox, what Form to select.
See the example below.
After the installation of Suptask, you will automatically be guided to the Setup of Suptask automatically in the Suptask Web App.
The wizard will walk you through the setup of your first Inbox and Form, making sure that you are onboarded 100% and ready to get started with ticketing on Slack using Suptask.
The wizard will help you set up the following on your new account:
A new Inbox with a predefined name or a name of your choice.
By setting up all of this, you will be ready to submit your first ticket in Slack using Suptask.
You can always customize your Inbox, Forms and Fields after the wixard is completed.
Agents and Users can optionally work in the same channel where tickets are submitted.
Learn more:
In case you run into any issues with the wizard you can always restart it and retry the setup.
An error occurs with the error message: token expired
This is due to an invalid client token when trying to communicate with the Slack backend. Please logout and login again, this should solve the issue.
The Inbox could not be created
Try to select another name of the Slack channels. Review the detailed report at the end to note down any error that appears. Try to relogin and if it does not help, contact Suptask Support.
In case you run into any issues with the wizard, try to relogin and start over. If it does not help, please contact Suptask Support and we'll assist you to get started.
Proceed to understand the different Ticket submissions:
Move the ticket to another team Inbox as it needs to be escalated
Contain the replies on the ticket for the new team to review
Create a new ticket and reference it automatically to the origin ticket
As an Agent, open a ticket.
Press on the More options action button (with the three dots).
Select Move & Escalate.
Select what Inbox to move the ticket to.
Fields from your original Form to the new selected one will be auto-mapped. Any mismatches will be highlighted.
Confirm by pressing Submit.
The original ticket will automatically be set to Closed. Both tickets will contain references between the tickets, making it is easy to retrieve the context from any of the tickets.
Escalated
Waiting for customer
On-hold
Closed
These values can represent different stages of the ticket through its lifecycle, from Open, to Active and finally Closed.
Statuses can be customized to your needs, for example with additional and changed values:
Open
In-progress
Queued
Waiting for approval
Escalated to Engineering
Solved
You can customize all your account statuses on the Manage fields page by editing the Status field.
The classifications defines the real state of a Status. Any custom statuses you add will be classified as an Active state.
Open = Ticket is created and opened. This state can not be removed.
Active = Ticket is active and not closed nor opened.
Closed = Ticket is closed. This state can not be removed.
You can configure this behavior using the option Message author as Requester in your Account settings.
The handoff feature allows you as an Agent to create the ticket without having to fill in all of the fields. Instead Suptask will automatically notify the Requester user after the ticket has been created, and allow them to enter all missing fields.
Every ticket that is waiting for additional information from the Requester using the handoff feature, will be marked with the ❓ emoji until the information has been entered.
Agents have the option to change the Requester from one user to another on tickets that are not submitted privately.
The Requester can be changed by editing the ticket and changing Requester by selecting another users in the selection list.
Suptask can automatically send out a CSAT survey when a Ticket is Closed, to survey the user about their ticketing experience. The CSAT feature is enabled per Inbox in Suptask.
Users who have submitted a ticket will receive an automatic CSAT survey as soon as the Ticket status is changed to Closed. The survey is a part of the Ticket message thread.
The CSAT survey allow for an additional comment to be added as feedback, which can be visible for Agents later when analyzing tickets
Use the dedicated CSAT dashboard which provides a high-level view of the CSAT satisfaction score for a timespan of your choice.
The dashboard is interactive, allowing you to drilldown into the grouped score to identify what Tickets that received a certain score.
For example, drilldown into all Tickets that received a score of 1 to view the details including any CSAT comment feedback.
Connect Suptask as a Partner / MSP to manage ticketing for your clients.
Connect Suptask with multiple standalone Slack workspaces.
Connect Suptask and support your franchise partners using separate Slack workspaces.
Connect Suptask to support your users in your Slack Community
Multiple Slack workspaces can be connected together with Suptask, allowing you to manage ticketing across several different Slack workspaces.
Agents will retain a single overview of tickets across all workspaces including all the great features that comes with Suptask. Including dashboard analytics and reporting.
Suptask can connect these workspaces together by:
Establishing one workspace as the primary workspace where Agents will manage and respond to tickets.
Establishing one or many secondary workspaces, where users can submit, overview and track their tickets.
The Multiple workspaces feature is often used by an internal organization or a partner / MSP who manages tickets with their clients.
Slack Connect is often used for external communication with other organizations.
Slack Connect is locked down to individual channels, while the Multiple workspaces feature connects the complete workspace.
Multiple workspaces do not have any limitations on how tickets can be submitted.

An Agent of the ticket can request approval for any ticket that is currently active. There can be one or many approval requests sent within the same ticket. This allows you to request different approvals from different parties. Every approval request can be sent to one or many users within your Slack workspace. Within every approval request sent, you will be able to track who have accepted or rejected your request, and the overview of replies from your approvers.
When an approval request is sent to a user, that user will receive an automatic notification from Suptask in Slack. Every approval request includes the options for the approver to either Accept, or Reject the approval request. The approver receives access to read the content and the replies sent in the ticket. This makes it easy for the approver to understand the context of the approval request. The approver can reply within the ticket, making it possible to chat with the parties of the tickets in case there is any follow up questions or clarifications required. As an approver you can select to Unfollow the ticket whenever you are done with your approval request. After you have unfollowed a ticket, you will no longer receive any updates on it nor will you be able to send any replies to the ticket.
Within a ticket you can send an Approval request to one or many parties. which is recorded in the ticket for audit and compliance. Every requests is saved inside of the ticket, including the specific approval request text. Any changes from approvers, such as changing their decision from approved to rejected, will be recorded and saved in the ticket. A summary of the current state of the Approval request is also recorded on the ticket, which makes it easy to track who have approved and who have rejected over a timeline.
Use the search bar at the top of Slack, you can also type ⌘+G on a Mac or Ctrl+G on Windows or Linux, in order to access it.
All tickets that your users have access to will be searchable in Slack.
Simply search for the Ticket ID with Slack search like this: #423
You can search across all ticket comments and replies that your user have access to in Suptask.
Simply enter any phrase in the Slack search and it will search across your tickets.
In your Account settings you can turn on these two options:
Publish submitted form fields in ticket thread
AI summary of closed tickets
This allow you to be able to search for all the submitted Fields in the Form used by the ticket. Making it possible to get additional content seachable in Slack.
Searching across the generated AI content where the Problem and Solution of a ticket is recorded will help you to build knowledge and easily search across all of this directly in Slack.
Select Mail > Forwarding.
Toggle the Enable forwarding switch, enter the forwarding email address:
Forwarding email address: [email protected]
Select Save.
Essentials for your daily work
How to optimize your daily work with Suptask
Working with tickets
How to submit a ticket
Setup & Configure
Inboxes

Learn how Agents and Users can collaborate together on tickets
Agents can optionally work in the same channel as the Users, where tickets are submitted. This could be needed if you want to have a completely transparent ticketing experience, where Agents can respond to tickets openly together with the Users.
Product and Engineering can triage tickets together that are sent in by Customer Success / Customer Support team in one shared channel #product-support.
Cooperate between teams & departments to resolve tickets in one single channel.
Work together on resolving customer issues in one single channel.
Helpdesk is openly addressing requests together with users in a channel
Agents can open and edit the ticket directly from the channel where tickets are submitted. The action buttons on tickets can be visible on the ticket in this channel where you can edit and manage the ticket.
Set up a new Form in your Inbox
Select the type of Form, Slack Channels Ticket Submission
Proceed to select what channels to
Select the Slack channels where you want to Accept tickets from
The new Form will be now be ready in Slack.
Promoting Agents Have your Agents join in to the Responder channel in order to become an Agent and receive the proper permissions.
Mute the Responder channel To avoid notifications from multiple channels, we recommend that you in Slack if you intend to work in the Collaboration channel as an Agent.
Sensitive information Avoid sharing sensitive information in the channel as it is publicly available for all people in that channel. Use the if you need to manage sensitive information in your tickets.
Enable ticketing in your Slack Enterprise Grid with Suptask
Slack Enterprise Grid enables organizations to set up several Slack workspaces within a single Slack installation.
Learn more about Slack Enterprise Grid
Suptask can be installed in your Slack Enterprise Grid and support you with ticketing across the connected workspaces.
With years of experience working with enterprises, Suptask have developed a unique archiecture that allows several use cases in your Slack Enterprise Grid:
Use a workspace-wide channel for your users to submit tickets across workspaces.
Allow users across workspaces to submit tickets to an Inbox in Suptask
Centralize ticketing within a primary workspace for your Agents
Learn how to overview and track your tickets as an Agent
Suptask is available for all Agents in the Slack workspace. Every Agent can easily overview and track their tickets from the Suptask App in Slack.
There is also an extended overview available on the Suptask Web App that comes with additional filters, customizations and presets which all Agents have access to.
Open Suptask App in the left side menu on Slack
Press on Select filters button to the right
Select your desired filters e.g My active requested tickets
The filtered tickets will be listed
Open Web Overview - Link button can be found from Suptask App Home in the left side menu on Slack. You can also navigate directly to
Use Customize Views to change what columns to view and what filters to apply. This includes custom fields.
Open a ticket by pressing on the item in the list to view the details of the ticket.
Creating custom views can help you create focused overviews of your tickets:
Overview what tickets that are Unassigned.
Track what tickets are missing a reply.
Overview ticket for a specific form.
Filter out the tickets assigned to you.
Agents can edit and view details of a ticket, including assigning and changing the status. When a ticket is submitted, all the information on the Form is available for the Agent to review.
Try to search for "Suptask" in Slack and you should find the App if it is installed.
You can make sure to always have Suptask visible in the left side menu on Slack by adding it as a favorite.
Learn about the Default Fields used in your Forms
All tickets comes with a set of default fields that are always present on the ticket. These fields are visible for analytical purposes on the Dashboard, on tickets in Slack and on the Web, as well as filtering options on the Tickets view.
Assignee Who is assigned and responsible for the ticket
Status Status of the ticket
Priority The priority of the ticket
Description Contains the main description of the ticket
Organization This is a multi-purpose field that can be used to track departmants, teams or end-customer names.
Tags Different Tag values that allow you to categorize all your tickets.
You can choose to change the visibility of default Fields on selected Forms. Allowing you to display Fields such as Priority and Assignee towards the Requester when they submit the ticket. This can allow you to have Requester select more of the fields when they are submitting a ticket.
All default fields can be renamed and translated to your local language, or your own preferred terminology. The names will be adjusted on the Fields and be visible on the Form.
All your users who are submitting tickets will see the custom or translated name, empowering you to use your local language towards your users for the best experience.
Learn how to add Followers to individual tickets
One of the useful features of our ticketing system is the ability to add additional users to follow and track tickets. This feature allows you to include individuals who are not part of your team of agents but possess expertise that may be required for specific tickets.
By adding followers, you can bring in people with the necessary knowledge or skills to contribute to the resolution of a particular ticket. These followers have the ability to reply to and comment on tickets, providing their insights and suggestions.
Agents can add one or many users as a follower from across the Slack workspace on any of their active tickets.
Open the ticket where you want to add followers
Press on the more options (three dots) action button
Select Add Followers
Add the users you want to follow the ticket
Press on Submit.
The users will be automatically notified about the ticket.
A user who is added as a follower to a ticket, will automatically receive a message and a notification from Suptask.
The user will be able to reply in the ticket, as well as read the replies and the content of the ticket. This makes it easy to communicate with all the parties of a ticket.
The user can select to Unfollow the ticket, which will stop the user from seeing any updates on the ticket, as well as preventing the user to reply on the ticket.
Broadcast messages and send announcements to Slack Channels
With our new Announcement feature, you can now broadcast messages directly to multiple Slack channels with just a few clicks. This is perfect for sharing:
🚨 System outages or incident alerts
📢 Product updates and news
✅ Workflow or process changes
Multi-channel Support: Send one message to several Slack channels at once.
Slack Connect: Send messages to your customers that you support via Slack Connect.
Custom Messaging: Write a tailored announcement for your audience.
Markdown Formatting: Use Slack markdown to format your message with bold text, bullet points, links, and more.
Initiate the announcement by typing /suptask announce from your Inbox Responder channel in Slack.
Choose the inbox the message should be sent from (e.g., Customer Support).
Select one or more Slack channels you want to send the announcement to.
Write your message
Product News Share new features or improvements with customers in external Slack channels.
Incident Updates Keep internal teams informed during outages or service disruptions.
Helpdesk Tips Proactively send out how-tos or workflow changes to internal help desks.
For more help with formatting your announcement message, check out the .
Learn how to set up business and work hours for your Agents
Inboxes can be set up with your Agent's default work hours, including the timezone they are in.
With the business hours of your Agents, you can get accurate calculation of performance metrics and customize notifications to the work schedules of your Agents.
Each inbox can be configured with business hours for your Agents:
Start time
End time
Business days
Timezone
Every ticket is measured on how fast it is resolved by Agents. With business hours configured in the inbox, every ticket is calculated with the respect of the business hours.
This improves accuracy of your metrics, where you can track the Actual Time To Resolution as it respects the business hours.
Learn how to display Suptask in the left menu in Slack
Having Suptask available in the left side menu on Slack makes it easy to access your tickets and other features that it offers.
Suptask is a Slack App operating inside your Slack workspace. Make sure your Slack Workspace admin have installed Suptask App.Add Slack to the left side menu in Slack:
Search for "Suptask" by using Ctrl+K or CMD+K. As an alternative, you can navigate to the Apps section in the left side menu, press on Add apps, and then find Suptask.
Press on Suptask and it should automatically be added to your left side menu in Slack.
Select to star Suptask App to keep it in your favorite list.
Done!
Learn how to use and integrate with the Suptask API
Suptask offers an open API that enables you to integrate programmatically and automate your ticketing process.
Review the OpenAPI v3 definition below.
The API requires a valid API token in order to authenticate to the API.
Retrieve the Form ID by opening up the Form from your Inbox and edit it. From the URL you can get the Form ID which is in a UUID format:
Every created field in your Suptask account have a unique ID that can be retrieved from the page by editing the field. The field ID is in a UUID format and be retried from the URL:
How to programmatically export data from Suptask
The Export API gives you access to a private area which you can access programmatically to get access to all your ticket data, which is updated on a daily, weekly or monthly basis.
It is ideal if you want to continuously export all your tickets to a separate storage for additional analysis, or for auditing and compliance.
All ticket information will be collected and available within your private API area, where you can retrieve them programmatically. It will be the same information and format that is available in the , which you can set up on your Suptask account. With the private API area you can list and download the file objects which contains all the ticket information.
The Export API requires a valid API access key pair in order to authenticate.
How to use Tags with your tickets
Tags is a default field which you can optionally use on your Forms. It allows Agents to further categorize your tickets by applying different tag values on tickets.
You can apply one or many Tags on a ticket:
The Tags can be filtered out on the Tickets overview to analyze tickets further.
Example use case:
Apply a Bug-tag if the ticket was related to a software bug.
Apply the Wifi-tag for a ticket that ended up to the Wifi
Apply the HR tag in case the ticket required help from HR.
You can manage your Tags from the by editing the Tags field.
You can view all tags for each ticket both on the Web and in Slack. There is also filtering capabilities available to create overview based on filtered tags.
Learn how to create tickets automatically from new messages
Tickets can be created automatically from any message sent in a channel. Any user or other Slack app in the channel who sends a message will automatically get a ticket out from that message.
This can optimize your ticketing creation, achieving faster ticket submissions and avoiding manual steps.
To set up automatic creation of tickets, configure a form in your Inbox using the form type Auto Creation of Tickets in Slack Channels.
Select the channel in which the automatic creation will be enabled. There can only be one Form configured for each channel where tickets are accepted to be automatically created in.
The Form with automatic creation can have multiple custom Fields, but they will be optional by default and can not be Required due to the fact that the user will not be prompted to fill in these fields. Agents can still fill in these Fields after the ticket has been created.
Suptask will allow you to have tickets created by other Slack apps and bots that are sending messages in channels where such Inbox form has been configured.
This can empower you to integrate automatic ticket creation based on triggers from other Slack apps, directly in your Slack workspace.
When an alerting app sends a message in a channel, you would want to have a ticket created automatically by Suptask, in order to track the remediation of the alert the alert.
Learn what limitations the Free plan has
The Free plan is a great choice for smaller teams, or teams who are getting started with conversational ticketing in Slack.
It is a smooth way to get your users to start working with Suptask in Slack, getting enough time to educate them and customize Suptask to your needs.
The Free plan comes with limitations that are applied as soft-limits, where accounts who are exceeding the limits over multiple months will receive automatic messages from Suptask.
Accounts that are continuously exceeding the limits will get their ticket creation blocked and can loose access to historical tickets.
Accounts can at any time upgrade to remove the limits. comes with many additional features to empower your ticketing experience.
Maximum of 10 created tickets per month
Limited to 3 months retention of tickets
Learn how to set up on-call rotation with Suptask
Suptask can help you to manage your ticketing with respect to any rotation schedules you have in place.
Rotation schedules are often used to manage on-call duties where a person is rotated on a regular interval, such as weekly, to manage certain tasks like incoming tickets or alerts.
Tellspin is a very capable Slack app to manage rotation schedules for your teams in Slack. Allowing you to configure everything from the rotation frequency to reminders.
Tellspin and Suptask have established a technical partnership where the applications are built to work seamlessly with each other.
Tellspin will automatically tag the person who is on-call when you write out the @Tellspin username in Slack where Tellspin have been enabled.
With the Automation rules from Suptask, you can have this process to be fully automated where Suptask can automatically tag @Tellspin when a new ticket is created. Making the Agent who is on-call aware of the new ticket automatically.
can be activated on your account by contacting Suptask support.
Set up a new Automation rule on your Inbox or Form
Configure the rule to be of the type Automatic reply
Edit the rule to send the reply to the Inbox Responder channel where your Agents are.
In the message sent in the reply, tag the @Tellspin app by writing out its member ID, for example: On-call assignment required <@U43232123>
When a new ticket is created, the automation rule will be triggered and send the reply where @Tellspin app is tagged. @Tellspin will automatically tag the user who is on-call.
Learn how to overview and track your tickets as a User
Suptask is available for all users in the Slack workspace. Every user can easily overview and track their tickets from the Suptask App in Slack.
There is also an extended overview available on the Suptask Web App that comes with additional filters, customizations and presets which all users also have access to.
For the majority of use cases, users can use the Suptask App in Slack to track and overview their tickets.
Open Suptask App in the left side menu on Slack
The default filter will show all the tickets your user have submitted.
To change the filter, press on Select filters button to the right
Select your desired filters e.g My active requested tickets
Try to search for "Suptask" in Slack and you should find the App if it is installed.
You can make sure to always have Suptask visible in the left side menu on Slack by adding it as a favorite.
Learn the methods of creating tickets with Suptask
Learn how to get quick access to reaction emojis
Learn how to manage recurring questions with Canned replies
Canned Replies can be used to send pre-defined answers on recurring questions, without having to type the same answer over and over for different tickets.
It can save you time writing the answer every time a ticket comes in with the same question, making your work as an Agent easier.
Canned Replies are stored per Inbox, which means that you can have different replies for different Inboxes. This can help you have different replies for the different teams that are using Suptask.
Configure and troubleshoot the email integration for Gmail and Google Workspaces
In this article we help guide you through how a common setup can look in Gmail & Google Workspaces when integrated with Suptask.
The Suptask Email integration is receiving emails from an address which in turn forwards the emails to Suptask. By using forwarding from a local address on the customer side, Suptask can validate the emails and direct them to the correct Inbox, as well as secure who delivers the emails to Suptask.
We will make use of the Routing rules in Gmail in order to setup forwarding to Suptask.
Learn how to set up the integration with GitLab
Learn how Suptask can remind you about your tickets
Personal summary notifications are an efficient way to get an overview of your tickets, how many tickets you have and when the tickets were last updated.
Suptask can send Users and Agents automatic summary notifications of their active tickets. Agents will also receive information about all tickets that are unassigned across their assigned Inboxes.
The notifications is sent by Suptask in the morning of the user's defined timezone in Slack.
Learn how to use the JIRA integration with Suptask
This is a deprecated document which have been replaced by the .
The Suptask integration with JIRA (e.g JIRA software) enables you to escalate tickets directly from Slack to JIRA. With a single reaction emoji (the 🌪️ :tornado:) you'll be able to create tickets to your choice of repositories, directly from a Suptask ticket in Slack.
Learn how to use the GitHub integration with Suptask
Learn how to automate and integrate with other Slack Apps
How to replace manual forwarding of Emails with AI routing
AI Email routing is a part of the Custom plan. Contact to request access. Additional cost might apply.
Suptask built-in AI routing of Emails will automatically route the incoming email to the correct person or team. This automation replaces distribution groups and manual forwarding of emails, as the system learns about the incoming emails and where to route it.
Learn how to customize Suptask with the Account Settings
Learn how to make use of the Suptask AI Assistant
The AI assistant helps you in your daily work with tickets by creating an automatic summary of each ticket when it is closed.
Each ticket can have several replies between Agents and users, which can create a very long thread of messages back and forth. This can make it challenging to understand the context of a ticket.
Suptask's AI assistant automatically analyse the messages inside of a ticket and creates a summary with the problem and solution when the ticket is closed.
This makes it easy to understand the context of each ticket by just looking at the summary at the end of each ticket. It also helps building knowledge across your team members over time.
Alerting App When an alerting app sends a message in a channel, you would want to have a ticket created automatically in Suptask, in order to remediate that alert and follow up on the task.
HR onboarding Have your HR platform (such as Rippling) send a message in a Slack channel which Suptask picks up to make a ticket from.
Other ticketing systems When another ticketing system is used, such as Zendesk, you can have it write the ticket as a message in a Slack channel, which Suptask can pick up and create an internal ticket of. This can be useful if several teams need to send tickets to each other across systems.
Before setting up the integration, make sure to create a dedicated channel for the integration, where the other App can post messages and where Suptask can pick these up to create Tickets.
Configure a Form in your Inbox to create tickets from messages automatically in a selected Slack channel.
Set up your other Slack App to post messages to the Slack channel
Suptask will automatically create a ticket from each new message in the channel, with all the content posted by the other app.
For example: if you have 400 users in your Slack workspace but only 5 Agents in Suptask, those 5 will be charged for.
Suptask will automatically calculate the number of Agents where we identify all the users who are a part of the Responder channels that is connected to your Inbox.
Every user who is a part of a Responder channel in Slack will be an Agent.
Suptask has a 6 hour grace period before we charge for any newly invited Agent. This allow you to remove any user that was invited by mistake before they are charged for.
You will be charged for any newly added Agents on the same day. If you remove an Agent, it will be accounted for on your next billing cycle.
You have two Inboxes with separate connect Responder channels in Slack.
These 2 Inboxes have a total of 10 unique Slack users that have joined the Responder channels. You will then be charged for a total of 10 Agents. In week 3, there are 5 additional users joining the Responder channels of the Inboxes. You will be charged for an additional 5 Agents.
In week 5 there are 2 users leaving the channels. On your next billing cycle the 2 agents will be deducted for.
Suptask makes use of prorated billing, which is a method of bill calculation based on a partial period of service rather than a full billing cycle.
It lets customers pay for the portion of the service period they use and not the entire service period, which makes billing more accurate.
In order to change the amount of licensed Agents that you are charged for, you can remove Agents from your Inboxes. This will automatically update the subscription on your account
These channels will be your Collaboration channels
Customize the Form with the Fields you require.
Save & Publish
You can find the member ID of Tellspin by viewing the Tellspin user in Slack > Pressing on the three dots (More options menu) > Copy Member ID
Done.


Easy channel selection: Choose channels based on the Inbox and team (e.g. Customer Support, Engineering, or Ops).
Click Preview to review the message before sending.
Hit “Send Announcement” to broadcast the message instantly.


By default a confirmation email is sent back to the requester. You can optionally disable this.
Emails sent from Suptask back to the requester can have the layout customized to your requirements, such as your own branding and name.
We allow you to customize many parts of the, from the text content to the colors.
background: #f4f4f4
containerBackground: #fff
header: #333
content: #000000
footer: #000000
ticketTitle: #faafe1
ticketText: #faa555
newLabel: #5a2211
border: #3d9cdc
suptaskLink: #34495e
replyAbove: #b5b5b5titleCreated: Your ticket #{{ticket.ticketNumber}} has been created
receivedMessage: Your request has been received and created as ticket <strong>#{{ticket.ticketNumber}}</strong>. We'll get back to you as soon as it has been reviewed.
additionalInfo: You can share any additional information or attachment by replying to this email.
newLabel: (NEW)
titleClosed: Your ticket #{{ticket.ticketNumber}} has been closed
titleUpdated: Your ticket #{{ticket.ticketNumber}} has been updated
updateMessage: Your ticket has been updated. Here are the most recent replies:
recentRepliesLabel: Recent Replies
sentTo: Sent to {{message.author}} from {{companyName}}. Delivered by
deliveredBy: Suptask
deliveredByUrl: https://www.suptask.comOpen a ticket by pressing on View.
From here you can view, manage and reply on tickets.
The filter will be automatically applied on the overview.
Select any of the available tickets to view, manage and reply.
You need to have an Inbox and a Form in order to submit tickets with Suptask.
Several creation methods are generic across your Slack workspace, and some require the Suptask App to be invited to the channel or given explicit permissions by users.
Submitting a ticket with certain methods in Slack will open up the Create a ticket dialogue. This dialogue is a starting point to submit tickets across all your Inboxes, Forms and Channels.
Submit your ticket to a channel This option will group all the channels that are configured on Forms that are using Collaborative Ticket Submission.
Submit a ticket directly to an Inbox This option will group all your Inboxes which have Forms of the type Private Ticket Submission.
When a ticket is submitted it will be routed to the Inbox via the Form which it was submitted with. The Agents in the Inbox will be automatically notified via the Responder channel in Slack.
The user who submitted the ticket will automatically be notified in Slack, just like a normal message, when there is an update on the ticket.
A ticket that is submitted on behalf of a user, will notify both the user who submitted the ticket and the user who is the requester of the ticket. Any updates to the ticket will only be shared to the requester of the ticket.
Trumpet (:trumpet:) 🎺
The Ticket 🎫(:ticket) emoji enables your users to create Suptask tickets while the Trumpet 🎺(:trumpet) emoji allow your Agents to send public replies back to the users that have access to the submitted ticket.
To make One-click emoji's to be visible, users might need to perform the following steps in their Slack account:
Open the Slack client
Navigate to Preferences (click on your user image in the lower left corner in Slack)
Select Messages & Media
Scroll down to the Emoji section
Enable the option Show one-click reactions on messages
Use the Custom alternative and select the two emoji's:
Ticket (:ticket:) 🎫
Trumpet (:trumpet:) 🎺
Done!
Additional reading can be found from Slack:
As an Agent, you can send a Canned Reply by pressing on More Options or "..." on a ticket, and then selecting Canned Reply:
From here you can choose to Select reply on this Inbox that you would like to send. By selecting a Canned Reply, you will get a preview of the message which you can send by using the Send reply button.
Canned Replies are configured per Inbox from the Responder channel which is connected to your Inbox.
You can initiate the configuration by typing the following message in the Responder channel in Slack:
/suptask canned
This will present you with three options to manage your Canned Replies:
Add - Add a new Canned Reply
Edit - Edit an existing Canned Reply
Delete - Delete an existing Canned Reply
After you have added your first Canned Reply, it will be available on all tickets in the associated Inbox.
Navigate to the Gmail app configuration inside of the Admin panel of Google Workspaces. In here you can set
In the Workspace Admin panel, open the Apps
Select Google Workspace
Select the Gmail app
Select Default routing
Select Add Another Rule in order to create a new routing rule.
The important fields to set up next in the rule are:
Single recipient Email address - Which incoming email this rule should be applied to. This is your local address.
Add more recipients - Use the Basic setup and enter the Suptask email address to forward emails to: [email protected]
Options - Make sure to have this value selected: Perform this action on non-recognized and recognized addresses
The account name of your GitLab account. Can either be an organization or personal account. In this example the account name is acme.inc, the repository is core (case-sensitive) and the server is https://gitlab.comExample: https://gitlab.com/acme.inc/core
Create an access token for your user account in GitLab. You can find it from your user profile or by navigating to your user account > Preferences > Access tokens.
Access tokens can also be created for Projects. In such a case, make sure the Role is set to minimum Developer.
The minimum Scope for the token needs to be the following:
apiStore the token once you have it. You will need it when configuring the integration within Suptask.
Navigate to the Integrations page in your Account.
Press on +GitLab button to create a new Gitlab integration.
Give it a name and specify what Suptask ticket forms to enable the integration for. Tickets initiated through forms are then enabled with the trigger to create a ticket within the integration system (in this case GitLab).
Next you will need to create credentials for your integration. Credentials can be shared across several integrations of the same type. Here you will need your GitLab server URL and the Access token that you stored from your Gitlab account.
Proceed to the next step and enter the GitLab account name that you collected from the preparation step.
Specify what repositories in GitLab you want to enable the integration for. Make sure you enter the exact name, case sensitive. If you enter the incorrect name, the integration connection will not work.
Finally specify if you want to add any default GitLab labels to the tickets that are created from Suptask.
Done! The integration is now activated.
Make sure you are within the Responder channel of your Inbox.
On one of the received tickets in the channel, add the :tornado: 🌪️ reaction emoji to the ticket message in the channel. See below for a sample screenshot.
This will trigger a selection where you can specify to what integration target you want to send the new ticket, the same as configured in the previous step.
From here you will be able to edit the Description and Title of the issue sent to Gitlab. The Description field is pre-populated with a default template which you can edit according to your needs. Use the Suptask ticket placeholders to include Suptask ticket information automatically into the Gitlab issue. Especially the ticketUrl placeholder is valuable as it takes you directly to the Suptask ticket in Slack as a reference.
Gitlab supports quick actions which can help you perform further actions by entering these directly at the end of the Description field. This allows you to for example set specific labels for the created issue. Read more here Example screenshot on adding the the :tornado: 🌪️ to a ticket message in the responder channel:
After creating a related ticket in GitLab, the ticket message thread in Slack will receive the GitLab issue url, linking the both tickets together.
The personal summary notifications are by default activated for Users and Agents.
Any user in Slack can at anytime manage their notifications using the quick command that can be written in the message field in Slack in order to setup or manage their notifications:
/suptask mysummary
Every user who have interacted with Suptask and have any active ticket can receive a notification from Suptask.
Summary notifications can be customized by each user by selecting Manage on the sent summary message from Suptask:
Users can customize their summary notifications to receive them according to their requirements:
Enable or Disable notifications
Define what weekdays the message should be sent.
Select all your business days to receive notifications daily.
Select only one day to receive notifications weekly.
Create an API token for your user account in JIRA.(https://support.atlassian.com/atlassian-account/docs/manage-api-tokens-for-your-atlassian-account/) Store the token once you have it. You will need it when configuring the integration within Suptask.
The JIRA Project ID (e.g 10000) of the Project where you want tickets to be created in. Read more: https://confluence.atlassian.com/jirakb/how-to-get-project-id-from-the-jira-user-interface-827341414.html
The issue type ID (e.g 10001) which should be used when creating the issue in JIRA Read more: https://confluence.atlassian.com/jirasoftwarecloud/finding-the-issue-type-id-in-jira-cloud-1333825937.html
The email of your JIRA/Atlassian user account e.g [email protected]
The URL of your JIRA Software instance e.g https://myacme.atlassian.net
Make sure you are within the Responder channel of the Inbox.
On one of the received tickets in the channel, add the (the 🌪️ :tornado:) reaction emoji to the ticket message in the channel. See below for sample screenshot.
This will trigger a selection where you can specify to what integration target you want to send the new ticket to.
Use the placeholders to add in Suptask ticket information. Especially the ticketUrl placeholder is valuable as it takes you directly to the Suptask ticket in Slack as a reference. These placeholders include the Suptask ticket link, description, fields, ID etc.
Example screenshot on adding the tornado to a ticket message in the Agent Responder channel:
After creating a related ticket in JIRA, the ticket message thread in Slack will receive the JIRA issue url, linking the both tickets together.
The account name of your GitHub account. Can either be an organization or personal account. Specify the GitHub account name without the domain. If you are using github.com/acme-inc then the account name specified in this field should be acme-inc (case-sensitive).
Create a personal access token for your user account in GitHub. You can find it from your user profile or by navigating here github.com/settings/tokens. The scope for the token needs to be the following: repo : Full control of private repositoriesStore the token once you have it. You will need it when configuring the integration within Suptask.
Navigate to the Integrations page.
Press on +GitHub button to create a new GitHub integration.
Give it a name and specify what Suptask ticket forms to enable the integration for. Tickets initiated through forms are then enabled with the trigger to create a ticket within the integration system (in this case GitHub).
Next you will need to create credentials for your integration. Credentials can be shared across several integrations of the same type. Here you will need your GitHub username and the access token that you stored. Note: The username is not always the same as the account name.
Proceed to the next step and enter the GitHub account name that you collected from the preparation step.
Specify what repositories in GitHub you want to enable the integration for. Make sure you enter the exact name, case sensitive. If you enter the wrong name, the integration connection will not work.
Finally specify if you want to add any default GitHub labels to the tickets that are created from Suptask.
Done! The integration is now activated.
Make sure you are within the Responder channel of your Inbox.
On one of the received tickets in the channel, add the 🌪️ (:tornado:) reaction emoji to the ticket message in the channel. See below for sample screenshot.
This will trigger a selection where you can specify to what integration target you want to send the new ticket to.
Use the placeholders to add in Suptask ticket information. Especially the ticketUrl placeholder is valuable as it takes you directly to the Suptask ticket in Slack as a reference.
Example screenshot on adding the tornado reaction emoji to a ticket message in the Responder channel:
After creating a related ticket in GitHub, the ticket message thread in Slack will receive the GitHub issue url, linking the both tickets together.
No need for distribution groups and manual forwarding
AI automatically learns content and routes the email to responsible Agents
Automatic categorizing of Emails using Forms
Combine with automation to automatically assign or set priorities
When a new email comes in, our built in AI routing engine will evaluate the email and decide to which of the enabled AI email Forms to route the email to.
Subject: Need help with my credentials
Content:
Hi, I need help to access my account, I have lost the credentials to it, can you help?
When the AI have decided where to send the email, a new ticket will be created for that Form and Agents will be notified.
For example, the AI would in this case select the Form Account issues based on the context of it and the email content.
If the AI does not find a suitable Form, it will use the configured fallback Form to create the ticket with.
Confirm that you have the email integration set up with the email address of your choice.
Contact your Suptask Integrations Specialist (SIS) to enable the AI email routing and configure it on your account with the Forms of your choice.
By default, emails that we cannot match against a Form or Inbox will be routed to a default Form.
You can optionally drop these emails, which can be useful in case you do not wish to create tickets for the emails that cannot be matched.
All ticket information is available within the built-in search in Slack, making it easy to find recurring problems and solutions on previous tickets.
Your privacy is a top priority for us and this includes the use of AI. The AI is not using your data to train the model. We only use the data that you have provided in the ticket to create the summary of the ticket when it is closed.
The summarised data on the ticket consist of a title, problem and solution. This data is stored as long as the ticket is retained.
Suptask AI assistant can be turned off on your account. Visit the Account settings to switch off the AI Assistant.


Learn how to make use of Forms inside your Inbox
There can be multiple Forms in each Inbox that can help to categorize the requests that are being submitted by your users.
By categorizing your requests with different Forms, you can easily guide your users to submitting the correct information for their requests, as well as filtering and overviewing tickets based on the Form.
Below follows a set of examples on how you can categorize your incoming requests in an Inbox using different set of Forms.
Navigate to and select your Inbox
Create a new Form by selecting New form.
Select what type of Form to create.
If the type of Form uses a Slack channel, select the Slack channels in the next step to enable ticket submission in the selected channels.
You can make all of your fields submitted in a Form searchable in Slack, making it easy to find particular values across your tickets when using the search functionality in Slack.
Activate the Account setting which will output all submitted field values in the ticket thread, automatically making them indexed and available in Slack search.
You can use multiple Custom Fields to build up how your Form should look, helping you receive the exact information you need when a user submits a request using a Form. Proceed to learn more about Custom Fields:
Learn more how to set up recurring reports
Recurring reports contains statistics and data about all your tickets within Suptask. It enables you to continuously retrieve data on tickets to perform your own calculations and visualizations.
As the reports are delivered in a raw format using Comma Separated Values (CSV), it is very easy for anyone to feed this data into a spreadsheet application like Excel, or to a separate Business Intelligence (BI) reporting tool.
Reports are delivered via email and can be sent to multiple recipients.
Log in to your Suptask account.
In Account Settings, navigate to .
Activate the Enable report delivery checkbox
Select the email delivery day and time
If you are not receiving your reports, they are very likely being blocked by a email protection service (such as the built in spam filter). Here is what you can do in on your email account to help receive the emails:
Make sure to check your junk and spam folder in your email client.
Mark the email from Suptask as not being spam or junk.
Whitelist the email domain suptask.com to avoid emails being blocked.
When you open a CSV file in Excel, sometimes the data does not display correctly, for example, special characters might appear garbled, or the content might all appear in one column. This often happens because Excel guesses the file’s encoding or delimiter incorrectly.
Below are two recommended methods to correctly interpret a CSV file in Microsoft Excel.
This method works if you have already opened the CSV in Excel and see all data in a single column.
Open the CSV in Excel (or paste its contents into a worksheet).
Select the column containing the combined data.
Go to the Data tab in the Excel ribbon.
Click Text to Columns.
This method is ideal when:
The CSV contains special characters (like accented letters or symbols)
You want to load the data into a structured Excel table, ready for filtering and pivoting.
Download the CSV file from its source.
Open a blank Excel workbook (do not open the CSV directly).
Go to the Data tab.
Click Get Data → From File → From Text/CSV.
Ticket data can also be exported via the API, to empower automatic integration export.
Send automatic reminders when tickets break a threshold
Service Level Agreements (SLA) enables you to define how Agents should work with tickets in order to provide a good experience to requesters.
This is done by defining certain thresholds that are applied to your Inbox, where tickets need to comply by these thresholds.
Agents will automatically be notified about potential or executed breaches, making it easier to stay on top of your tickets.
Priority levels: Define what Priority levels the SLA rule should be applied on. None, or Low, Medium, High, Critical
Resolution time: Time it takes to move a ticket to Closed (Solved). Calculated from when the ticket is created to when it is closed.
Reply time: Time it takes to send replies as an Agent (via the Responder channel) to Requesters. Calculated from the last reply. For the first reply, it is calculate from when the ticket was created.
Tickets who are about to breach its SLA threshold, or faces a risk of doing so, can automatically notify Agents and other users.
Send a notification prior to a threshold breach: Define the time in minutes when the assigned Agent should be notified about a potential breach coming up.
Send a notification when a threshold has been breached: Define the time in minutes when the assigned Agent should be notified when a threshold has been breached.
Send an escalation notification: Select another user than the Agent who should be notified about the breach, for example the manager or team lead of the Agent team.
An SLA breach will occur when a threshold is exceeded.
Notifications are sent in the ticket targetting the assignee(s) when a threshold is breached.
Optionally you can configure a reminder notification prior to a breach.
Escalations can be sent to any user of your choice.
Learn how to make use of integrations
Integrations are a part of the Custom subscription plan. Contact Suptask Support to get started.
Integrations can be used to optimize your workflow and make it more efficient when you are working with Suptask tickets in Slack.
Suptask can integrate against any system of your choice, either using our native built-in connectors or using custom APIs and webhooks.
Suptask integrations are set up together with your technical contact at Suptask.
Keep tickets up to date between Suptask and other ticket systems, such as Zendesk
Sync tickets and comments between issue trackers, such as Gitlab & Github.
Enrich tickets with customer data from CRM such as Salesforce or HubSpot
Push tickets to an external safe-storage for Audit & Compliance.
Integrations are flexible and can be set up according to your requirements. This enables flexibility where any integration or automations can be configured and embedded in your workflow.
You define your use case and share it with Suptask
Use case is confirmed by the Suptask Integration Specialists (SIS)
Integration details is collected according to the requirements of the use case
Integrations is configured and setup on your Suptask account.
Looking to get started with integrations? Contact to get started and access the setup guides for your integrations
Integrations is a managed service offering
How to integrate with ClickUp
Integrations is a part of the Custom plan. Additional cost might apply.
ClickUp integration brings comprehensive task and project management to ticketing, enabling teams to link ticket actions with project timelines and priorities.
Use Cases:
Automatically create ClickUp tasks for tickets requiring additional input.
Enrich tickets with progress updates and deadlines from ClickUp.
Sync ticket priorities with ClickUp task boards for better visibility.
Notify team members about ticket-related changes directly within ClickUp.
You need a ClickUp account in order to set up the integration.
Learn more in the ClickUp .
Select your profile picture and click on Settings
Select Apps
In the API token section, select Generate
Copy and share the personal API token securely with the Suptask Integrations Specialist (SIS) contact.
In order to have information sent back from ClickUp to Suptask, you would need to register a WebHook in ClickUp
Retrieve the Suptask WebHook URL from your Suptask Integrations Specialist (SIS)
Based on your use case, the events you register for in ClickUp WebHook might differ
You can find all events . Consult with your SIS contact on what events to use based on your use case.
Ticket in Suptask is created
Team of Agents decide to escalate to ClickUp for further development work, by moving the ticket to the Escalated status in Suptask.
The creation to ClickUp can also happen automatically for every created Suptask ticket in your Inbox, this is customizable.
Ticket is automatically created in ClickUp
The ClickUp integration is setup and enabled together with the Suptask Integrations Specialists (SIS).
Learn how to find the Suptask App in Slack
Your customers can overview all their tickets in one single place without having to scroll through the channel to track tickets.
With the Suptask App, they see all tickets that are active and submitted in their channel(s).
Learn how Agents respond and manage tickets
Submitted tickets are directed via the Form to the Responder channel of the Inbox.
Agents gets access to submitted tickets by being a member of the Responder channel in Slack. They can work privately as a team to resolve tickets together, leaving both Private and Public replies on tickets.
How to integrate with JIRA Software
Integrations is a part of the Custom plan. Additional cost might apply.
The JIRA integration aligns Suptask ticketing with agile project management and development issue tracking, providing a seamless link between support and development. This ensures tickets needing engineering support are efficiently tracked and resolved.
Use Cases with Suptask:
How to integrate with Zendesk
Integrations is a part of the Custom plan. Additional cost might apply.
The Zendesk integration aligns Suptask ticketing with agile project management and development issue tracking, providing a seamless link between support and development. This ensures tickets needing engineering support are efficiently tracked and resolved.
Use Cases with Suptask:
Learn how to overview and track tickets
Everyone can easily overview and track their tickets from the Suptask App in Slack.
There is also an extended overview available on the that comes with additional filters, customizations and presets which all Agents have access to.
Learn how to make use of Custom Fields in your Forms
You can customize the information users must provide when submitting a ticket, ensuring Agents have what they need to respond effectively.
Custom Fields allow you to add various types of input to your Form, such as list selections, multi-line text, and attachments.
The Static text field allows you to include instructions or helpful information to guide users through the submission process. You can add multiple fields to your Form for flexibility.
Custom Fields are created in your Suptask account and can be reused across different Forms.
Receive tickets via Email into Slack with Suptask
Email ticketing integration is a part of the Custom plan. Additional cost might apply.
The Email integration in Suptask allow you to receive emails which Suptask will automatically make a ticket of in Suptask, inside of Slack. You can easily work on the ticket inside of Slack, like any other Suptask ticket.
Form name: Account issues
AI Description: Requests related to any account issues from users, such as lost passwords, locked accounts and any other account related issues.
Form name: Hardware orders
AI Description: Requests related to all hardware orders such as laptops, keyboards, screen and phones.
Be aware that the timezone is UTC.
Enter the email addresses of the recipients who will all receive the report email.
Done!
In the wizard:
Choose Delimited and click Next.
Select the delimiter used in your file (usually Comma). (You can also check “Tab” or “Semicolon” if your file uses those instead.)
Click Next, then choose the correct Column Data Format (often General or Text).
Click Finish. Your data should now be split into columns correctly.
Navigate to the downloaded file and select it.
In the Preview window:
Ensure File Origin is set to 65001: Unicode (UTF-8).
Verify the data preview shows the correct characters and column separation.
Click Load. The data will be imported into a formatted Excel table, perfect for filtering, sorting, and creating pivot tables.
Transfer ticket data to an external data warehouse such as SnowFlake.
Perform analysis of ticket data in your BI system or in Google Sheets.
Connect Suptask to any Slack Workflow in your Slack Workspace.
Set up a custom Integration using an API or Webhooks.
Suggest or update knowledge base articles, for example in Notion.
Integrations are ready to be used.
Suptask can now take actions on events from ClickUp
Actions, replies and comments are automatically synced bi-directionally.
Status changes can be bi-directionally synced between the systems
Comments can be shared between the systems.
Agents in Suptask can reply on tickets directly in Slack.


Critical
1 hour
12 hours
None
24 hours
7 days
Low
12 hours
4 days
Medium
8 hours
2 days
High
4 hours
30 min
Waiting for customer
3
Daily
1 day
Greg (Manager)
Waiting for customer
3
6 hours


1 day
Salary questions
Office equipment request
Offboarding
Next, move on to the Fields
You can add new Custom Fields to your form, or select from any existing fields in your account.
You can manage and overview your existing fields on the Manage fields page.
Proceed to Preview how the Form will be displayed in Slack
Apply the order of the fields on the Form, as well as what Fields should be required and optional.
Save your Form and it will automatically be published and available in Slack.

Replies on tickets from Agents can either be:
Public reply The reply posted and visible for the Requester who submitted the ticket.
Internal comment The reply is internal and only visible to the team of Agents in the Inbox.
This allow your team of Agents to cooperate on tickets without having to leave Slack. It is as easy as sending messages to each other in a message thread.
This cooperation is empowered by the Responder channel that is connected to your Inbox, where Agents can send replies on the tickets directly in Slack.
This option is enabled by default, the replies on tickets in the Responder channel are by default Public and will be visible to the Requester.
Open the ticket in the Responder channel.
When writing your message, make sure to add the 🔒 (:lock:) emoji at the beginning of the message.
This will mark the reply as being Private.
Send the message which will make it a Private reply on the ticket, only visible to the team of Agents in the Inbox.
Open the ticket in the Responder channel
Send your reply in the ticket message thread.
This reply will be Public by default and visible to other Agents in the same Inbox & Responder channel.
With this option selected, the default replies on tickets from Agents in the Responder channel are by default Internal comments, and not visible to the Requester.
Any message sent on a ticket with this option enabled will be Private by default.
Open the ticket in the Responder channel
Send your reply in the ticket message thread.
This reply will be Private by default and only visible to other Agents in the same Inbox & Responder channel.
Open the ticket in the Responder channel
Send your reply in the ticket message thread, this reply will be Private until you make it Public.
Add the 🎺 (:trumpet:) reaction emoji on the message. See below on how to add the reaction emoji.
This will push the message as a Public reply back to the requester(s). The message will look like this when it has been pushed as a Public reply:
You can find the reaction emoji by hovering the mousepointer over the message you want to make Public.
From here you can search to find the emoji
Get quick access to the 🎺 trumpet and 🎫 ticket reaction emoji in your Slack client, by adjusting your preferences.
The replies for approvers and followers will always be Private by default, and not visible to the Requester of the ticket.
They always need to need push their reply explicitly to become Public by following the instructions for replies with Private visibility.
Accidentally sent a Public reply? You can withdraw a Public reply, making sure it is no longer visible to the Requester.
Open the ticket in the Responder channel.
Identify the Public reply message you want to withdraw, to make it Private and not visible to the Requester.
Edit the message
If your replies are Private by default: add the 🎺 (:trumpet:) reaction emoji on the message.
If your replies are Public by default: add the 🔒 (:lock:) emoji in the beginning of the message.
This will change the message from Public to Private, where the Requester will no longer see it on the ticket.
You can easily add additional users to a ticket in order for them to receive notifications from the ticket. This can be done by simply tagging the user in the ticket message thread, which will make Slack send notifications about updates to this user as well.
You can also make use of the Followers feature if the users you want to add are not Agents.
Sync ticket updates with Jira to keep teams up to date.
Enrich tickets with ticket details for broader project visibility.
You need a JIRA Software Cloud account in order to set up the integration.
Log in to your Atlassian profile and navigate to Security > API Tokens.
Click on Create API Token.
Provide a descriptive label for your token, such as Suptask Integration.
Click Create to generate the token.
Copy the API token that is displayed.
Share the API token securely with the Suptask Integrations Specialist (SIS) contact
Include the Email address linked to the token and the corresponding Domain e.g: [email protected] https://mydomain.atlassian.net
In JIRA, open the JIRA Settings in the upper right corner (on the cog-icon)
Select System
In the Advanced section in the left menu, open the WebHooks item
Create a new WebHook
Name: Suptask - New Comment
URL: https://... (this is shared to you from the Suptask Integrations Specialist (SIS) contact)
Select the following Events: Comment Created + Updated
Save
Ticket in Suptask is created
Team of Agents decide to escalate to JIRA for further development work.
The creation to JIRA can also happen automatically for every created Suptask ticket in your Inbox, this is customizable.
Ticket is automatically created in JIRA from Suptask, where the Suptask ticket is connected to the JIRA issue.
Actions, replies and comments are automatically synced bi-directionally.
For example, status changes can be aligned between the systems
Agents in Suptask can reply on tickets directly in Slack.
Example view from JIRA:
Example view from Suptask in Slack:
The JIRA integration is setup and enabled together with the Suptask Integrations Specialists (SIS).
Sync ticket updates between Slack and Zendesk in real-time.
Automatically enrich Slack tickets with information from Zendesk.
You need a Zendesk API key in order to set up the integration.
Log in to your Zendesk account.
Open the Admin Center.
Expand the navigation menu Apps and integrations > APIs
Click on Zendesk API.
Make sure the Token Access is Enabled.
Add a new API token
Share the API token value securely with the Suptask Integrations Specialist (SIS) contact
Include the Email address of your user account e.g [email protected]
Include the Zendesk Domain e.g: https://mydomain.zendesk.com
Log in to your Zendesk account.
Open the Admin Center.
Expand the navigation menu Apps and integrations > Webhooks
Click on Webhooks.
Create a new WebHook
Name: Suptask webhook
Request format: JSON
Request method: POST
Save
Next we'll set up the trigger which will initiate the Webhook.
In the navigation menu Object and rules > Business rules
Click on Triggers.
Create a new trigger
Define the conditions when the Webhook to Suptask should be triggered
Click on Add Action
Select Category > Notify by > Active webhook
The value set should be the newly created webhook from the previous steps, named Suptask webhook
The content is confirmed by your Suptask Integrations Specialist (SIS) contact, below is an example:
Save.
Ticket in Zendesk is created with the Bug tag.
Ticket is automatically created in Suptask
Actions, replies and comments are automatically synced bi-directionally.
For example, status changes can be aligned between the systems
Agents in Suptask can reply on tickets directly in Slack.
The Zendesk integration is setup and enabled together with the Suptask Integrations Specialists (SIS).
Open Suptask App on the left side menu on Slack
The default filter will show all the tickets your user have submitted.
To change the filter, press on Select filters button to the right
Select your desired filters e.g My active requested tickets
The filter will be automatically applied on the overview.
Select any of the available tickets to view, manage and reply.
Navigate to the Tickets Web Overview
You can also reach this from the Suptask App Home in the left side menu on Slack, by pressing on Open Web overview.
Use Customize Views to change what columns to view and what filters to apply. This includes custom fields.
Open a ticket by pressing on the item in the list to view the details of the ticket.
You can customize the Tickets overview on the Web and save it into different preset views, allowing you to quickly toggle between views and find the tickets you are looking for.
Filters Apply different filters to display the filters in the overview that matches the criterias.
Columns Select what columns to view based on the fields of tickets, including all your Custom Fields. This allow you to get all the ticket information visible in the overview.
From the Tickets overview you can share a link with the applied filter of the current view. This allow you to send a certain filter to other users.
You can view all details on a ticket in the Web and in Slack.
Navigate to the Tickets overview
Click on any ticket line item in the overview.
The left sidesheet will be opened
From the left sidesheet you can view all details of the ticket.
Open a ticket in Slack.
The information of the ticket will be visible in the right sidemenu.
Press on View & Edit action button to view all details of the ticket.
You can reply on tickets directly in Slack, just like a normal message using the message thread. From here you can track the conversation on the ticket with all the corresponding replies.
From the Tickets overview in the Web you can track all conversations on a ticket by opening up the Ticket details and select Conversations.
Try to search for "Suptask" in Slack and you should find the App if it is installed.
You can make sure to always have Suptask visible in the left side menu on Slack by adding it as a favorite. Learn how to display Suptask in Slack
Additional customizations can be done on Fields and Forms, such as what fields that the Requesters can see, like the Priority or Assignee field. Contact Suptask Support to get help with the customizations
You can create and manage Custom Fields on the Manage fields page.
The following types are available:
Single-line text User can write any kind of information such as a customer name or a date
Multi-line text User can write a lot of information on multiple lines such as a longer message or log data
Single-selection list User can select a single option from a list. You define what options a user can pick from.
Multi-selection list User can select multiple options from a list. You define what options a user can pick from.
Single Slack user Select a single user from your Slack workspace
Multi Slack user Select multiple users from your Slack workspace
Static text Add text with markup format to your form, allowing you to give instructions or general information to your users inside of your form.
Date time Select both a date and time.
Date Select a single date
Time Select a single time
File attachment(s) Attach files in your form.
Custom fields provides a number of possibilities to enhance the ticketing experience for your users.
You can create effective task lists within a submitted ticket by utilizing multiple Single-selection fields with values "Completed" and "Not completed."
These fields allow agents to quickly assess the status of various tasks associated with a ticket. By configuring these fields on the form and making them visible only to the agent, you ensure a streamlined workflow where agents can update and track task progress without cluttering the end-user view.
This method enhances clarity and efficiency, allowing agents to systematically manage each task's completion status directly within the ticketing system.
Images and other files can be attached when submitting a ticket or attached to an existing ticket. All files are automatically synced and stored.
The File Attachment field type allow users to attach files into Forms where the custom field is added.
Create a new Attachment field:
Navigate to the Manage fields page
Press on New field
Select the File attachment(s) field type
Specify the name of the Custom Field, for example: Screenshots
Ones the field is created, it will be available to be added on any of your Forms.
This will allow your users to attach one or many files directly on the form.
Users can submit attachments by adding them to their Slack messages. By creating a ticket from the message, the attachments will automatically be included into the ticket.
Users will receive a confirmation email back when their ticket has been created. This allow them to reply via email on the ticket, without having to be inside of Slack.
The communication is bi-directionally synced between Slack and the Email.
The user sends an email request to [email protected]. He will receive a confirmation email back from Suptask, confirming that a ticket has been created:
Ben who is an Agent in Suptask, will receive a notification inside of Slack with a direct access to the ticket including the ticket thread. This will include all email information which is now readable in Slack using Suptask:
Ben can read through the email sent by Bob inside of Suptask. She can reply on the ticket in Suptask, by using the ticket message thread:
Ben's reply will automatically be sent as an email back to the user who requested the ticket. Bob can view the conversation of the ticket within the email.
The user can reply on the email to add additional information to the ticket, including attachments. He will have visibility of the complete message reply thread of the ticket, and all information will be synced automatically into Slack.
Before you begin, make sure you have received the confirmation from Suptask Support that the Email integration is setup and ready on your account.
In order to complete the setup, you will need to follow the below steps:
Forwarding emails from the adress on your end that you own to [email protected]
e.g [email protected] should be automatically forwarded to [email protected]
Send an email to your address and confirm the ticket is created in Suptask.
Contact Suptask Support if you have any issues related to the Email integration.
The first email from a user to [email protected] should be forwarded to [email protected]
Suptask will validate the email, the forwarding address and the mapping to the Suptask Inbox.
Suptask will send an automatic reply back to the user with a confirmation that the email request has been received together with the ticket number. This email will be sent from the sender name Acme Inc and will use the sender address [email protected].
Reach out to [email protected] if you are interested in a custom domain.
The Suptask Agent named Kate will reply on the ticket. The user will receive an email from the sender name Kate (Acme Inc) with the sender address [email protected].
Suptask domains are using the most recent email security to ensure email deliveries. This includes DMARC, DKIM and SPF.
Essentials for your daily work
How to optimize your daily work with Suptask
Working with tickets
How to submit a ticket
Setup & Configure
Inboxes

Suptask can help you optimize the ticket creation for your users, by intelligently minimizing the amount of steps & clicks that the user need to perform to submit a ticket.
Automatically select an Inbox for the user By using only one Inbox, Suptask will automatically select this Inbox for your users.
Automatically select a Form for the user By using only one Form, Suptask will automatically bring up this Form for your users after selecting an Inbox, without the need to select a Form.
Automatically submit the ticket with a Form Only set the Description field as required and set all the other fields for the Requester as optional. Suptask will then automatically create the ticket without asking the user to fill in any fields.


How to integrate with Notion
Integrations is a part of the Custom plan. Additional cost might apply.
Notion integration simplifies knowledge sharing by linking ticketing with collaborative documentation. It ensures teams have quick access to resources for faster issue resolution.
Use Cases:
Maintain a dynamic knowledge base of ticket resolutions.
Enrich tickets with knowledge stored in Notion.
Track and keep tasks updated between systems.
Suggest knowledge base articles based on ticket request.
You need a Notion account in order to set up the integration. Within this you will also create a new integration with access to your notion pages.
Learn more in the Notion .
Navigate to your in your Notion account.
Çreate a New Integration
Assosciate it with the Notion workspace that you want to integrate with Suptask
Enter a Name and select the type Internal
Your new integration with Suptask will need to your Notion pages.
We recommend to connect your Suptask integration with the parent page at the top of the hiearchy of your pages. This will automatically give Suptask permissions to all sub-pages which will improve search results.
Open the parent page in the Notion workspace.
Click on the ... More menu in the top-right corner of the page.
Select Connections, and then click on the newly created Suptask integration
User submits a ticket in Suptask
Based on the request content, a search of relevant articles will be performed in the knowledge base.
Suggested knowledge base articles will be sent automatically in the ticket to the user.
This will help to automatically solve tickets for many users, without the involvement of Agents.
Ticket is opened and manage by Agents in Suptask
When ticket is closed, the automatic AI summary of the problem and solution of the ticket will be created.
Agents can select to push these to an article in the knowledge base in order to keep the content up to date.
This can be automatic or manual.
The Notion integration is setup and enabled together with the Suptask Integrations Specialists (SIS).
Submit tickets via online Web forms
You can automatically create support tickets from online web forms. Simply send form submissions to your Suptask email integration, and your team can reply just like any other ticket where the requester will receive the reply via email.
This setup is perfect for capturing:
Customer inquiries from your website
Internal requests from your intranet
Issue reports or feedback submissions
By connecting your form tool (like Tally Forms) to Suptask’s email integration, each form submission becomes a trackable, reply-ready support ticket.
An active email integration in Suptask
A web form tool like Tally, Clickup or Form Craft.
Access to set up form notifications (we recommend using Tally's "Self email notifications")
Suptask email integration is required to be enabled in one of your Suptask Inboxes.
This setup guide is using Tally Forms as an example, same setup applies to other form vendors (Formcraft, Clickup etc).
Follow these steps to forward form submissions to Suptask:
Create your form in Tally. Add fields like:
Name
Email (this will be used later in Suptask to help set the requester)
Message or Description
Each form submission is sent to [email protected]
Suptask automatically creates a ticket in your Inbox
The ticket requester is visible in the email content and can be set so that replies goes to the correct destination.
Your support team can reply directly via Suptask in Slack, just like any other ticket.
Use custom fields in your form to capture extra data.
Tag or route these tickets differently in Suptask using
You can test the setup by submitting your form and confirming ticket creation in your Suptask inbox.
If you need help setting up email integration or configuring Tally, reach out to our support team. We’re happy to walk you through it.
How to integrate with Google Sheets
Integrations is a part of the Custom plan. Additional cost might apply.
Google Sheets integration provides flexible tools for organizing ticket data, creating reports, and automating workflows. It enables centralized tracking and real-time updates, helping teams analyze ticket metrics with ease.
Use Cases with Suptask:
Automatically log tickets and ticket information.
Generate charts and dashboards for monitoring and performance reporting.
Analyze ticket trends to optimize support processes.
You need a Google Cloud Project and a Google Service Account account in order to set up the integration.
Navigate to
Open the project dropdown in the top navigation menu and select New Project
Select the location of this project and give it a name e.g "Suptask integration"
Create the project and make sure it is selected from the top navigation menu.
Official documentations from Google can be found here:
Retrieve the integration credentials:
Open the newly created Service Account, navigate to the Service Accounts section and select the Keys tab
Select Add Key and Create new key
Select JSON and proceed by pressing Create.
The JSON file will be downloaded to your local computer.
On certain Cloud accounts, the creation of API keys for Service Account is disabled. You will need to enable this from the
Open the
Find the policy with the ID iam.disableServiceAccountKeyCreation
Open the in your Google Cloud account
Search for these two APIs separately:
Google Sheets API
Google Drive API
This integration can be customized to your needs where certain fields and syncing options can be adjusted.
Here is an example of how this integration can work:
Ticket is created in Suptask
Suptask automatically pushes the ticket with all its options to the Google Sheet, where each field of the ticket receives its own column.
The Google Sheets integration is setup and enabled together with the Suptask Integrations Specialists (SIS).
Follow the steps in the
Create your Google Sheets document
Set up the columns you would like to have in your Google Sheets document. For example:
Ticket ID
Utilize roles to assign different permissions to your users
Suptask offers a number of roles to help you manage and delegate different features across the ticketing system. You can overview all your users and roles from the Users & Permissions page.
Only Agents that are added to an Inbox can access the tickets that have been submitted or moved to that Inbox.
This enables you to set up Inboxes for different teams, where only the Agents in each team will have access to the tickets within their Inbox.
All invited users in the connected Responder channel of an Inbox are automatically promoted to an Agent.
Adding a new Agent:
Invite the user to be a member of the Responder channel in Slack.
Removing an Agent
Remove the user as a member from the Responder channel in Slack.
There is a 6 hour grace period before the Agent will be added to your subscription and billed for,
Users who should have access to create and manage Inboxes and Forms will need to have the Suptask Admin role assigned.
With the Suptask Admin role assigned, users will have access to the Inboxes page, where they can overview all the Inboxes that they have access to, as well as creating new Inboxes.
You can have specific users as billing admins, allowing them to manage the Subscription & Billing, including receiving the receipts.
Either ask the billing contact to login to the Suptask Web App. After they have logged in, proceed to promote their user to the Billing Admin role. Alternatively you can proceed with your own user through the checkout, and then change the billing contact person after the payment has been completed. This will be available on the receipt sent back to your email, where the billing contact and VAT can be updated.
Learn how to automate your ticketing
By automating parts of your ticketing process, you can achieve an optimized workflow and higher efficiency as you work through your tickets.
The Automation feature in Suptask allow you to set up trigger rules and actions towards your tickets.
For example:
When a ticket is created in Inbox X, assign it to the agent with the least amount of tickets assigned currently.
When a ticket is created in Inbox Y, set the status of the ticket to In Progress automatically.
When a ticket is created with Form A in Inbox X, assign it to Agent Z.
When an update is happening on a ticket, send it to a Webhook url.
You can find from the main menu in the Suptask Web App.
The automation rules are dynamic, allowing you to customize automation to your need.
There are a set of built-in rules, and also the possibility to build-out automation based on custom rules which can be added per request.
Each of these rules can be configured on the Inbox and/or on a specific Form.
Set a specific status of the ticket when it is created.
Example:
When a ticket is created for the form New Laptop in the IT Inbox, set the status to Being Reviewed.
Set a specific priority of the ticket when it is created.
Example:
When a ticket is created for the form New Laptop in the IT Inbox, set the priority to Critical.
Assign a user to a ticket when it is created.
Suptask can automate the assignment of users with the following methods:
Round-robin
Random
Least amount of tickets
Fixed Agent
There are a set of options available to further customize the assignment:
Online only - Only assign the ticket to Agents who have their status set to online in Slack.
Exclusion - Exclude specific Agents from being included in the assignment
Example:
Assign the Agent with the least amount of tickets currently assigned, where the Agent need to be Online to be assigned.
can be enabled using one of our integrations
Automatically send a reply to the Requester or the Agents
Example:
Send additional instructions to the Requester after the ticket has been created
Trigger a Webhook request to a URL of your choice, enabling you to integrate with other systems such as Slack Workflows.
You can tag App's and Users in messages from Suptask in order to notify these users with Slack's built in notifications.
which you want to tag
In the message you want to send, add the member ID formatted as the following <@U43232123> where U43232123 is the Member ID.
We are constantly building out Automations and have several new rules coming out.
If you have ideas or requirements for your Automation,
The Responder channel is connected to your Inbox and is integrated in Slack as a private channel for your Agents.
It comes with several benefits:
Agents can leave private comments, search and manage their tickets directly in Slack.
Slack & Suptask will automatically send notifications about an updated or new ticket.
Users that are invited as a member to this channel will automatically become an Agent.
When a ticket is submitted with a Form, it is routed to the Inbox and will be visible inside of the connected Responder channel in Slack, where Agents receive a notification about the ticket and can start to respond to the ticket.
Learn how to set up Suptask with Slack Connect and External Connections
Learn how to submit tickets with Suptask
Suptask provides multiple methods for submitting tickets, catering to various user preferences and workflows. This article offers a comprehensive overview of all available ticket creation features.
Through detailed guides and instructional videos, you will gain a solid understanding of how to effectively interact with Suptask's ticketing system.
Message shortcuts are available and can be used on all sent messages everywhere in Slack, including channels, direct messages (DM) and any private group.
Learn how to analyze your ticketing with the Dashboard
Change the name of the Suptask App and white-label it as your own
The default name of the Suptask App in Slack is Suptask. In case you want to change the name to match your own branding, you can do so by following the steps below.
This is possible and can be done as a part of the configuration of the Suptask app in Slack.
You can specify any name of your choice to apply on the Suptask App, such as:
Suptask can help you optimize the ticket creation for your users, by intelligently minimizing the amount of steps & clicks that the user need to perform to submit a ticket.
Automatically select an Inbox for the user By using only one Inbox, Suptask will automatically select this Inbox for your users.
Automatically select a Form for the user By using only one Form, Suptask will automatically bring up this Form for your users after selecting an Inbox, without the need to select a Form.
Automatically submit the ticket with a Form Only set the Description field as required and set all the other fields for the Requester as optional. Suptask will then automatically create the ticket without asking the user to fill in any fields.
{
"requester" : "{{ticket.requester.name}}",
"description" : "{{ticket.description}}",
"tags" : "{{ticket.tags}}",
"id" : "{{ticket.id}}",
"link" : "{{ticket.link}}",
"url" : "{{ticket.url}}"
}Endpoint URL: https://... (this is shared to you from the Suptask Integrations Specialist (SIS) contact)
IT Support
Helpdesk
HelpBot
MyCompany Support
Open the Suptask App in Slack
Click on the tab About
Press on the button Configuration
This will open up the configuration page of Suptask in your web browser.
Scroll to the bottom of the page and find the section Bot user
Press on Edit and select the name of your choice.
Done.
Depending on your Slack account settings, you might need a Slack user with the Workspace Owner role to apply this change.
Creating tickets from existing messages By creating a ticket on an existing message, Suptask will automatically populate the ticket description field with the content of the message.
Set the Requester from the message author When creating a ticket from a message, the author of the message will by default become the requester of the new ticket. This can help you as an Agent when you create a ticket on-behalf of a user. You can customize this behavioe from the Account Settings.
Change it to Inactive
Enable them both.
Description
Priority
etc.
Share the required information with your Suptask Integrations Specialist (SIS).
Google sheets link and name
The JSON file retrieved from your API Key in the Service Account
Submit
Open the newly created integration and give it the required permissions:
Content capabilities: Read + Update + Insert content
User capabilities: User information without email addresses
Save.
In the Internal Integration Secret field, copy the value and share it securely with your Suptask Integrations Specialist (SIS).
The selected Notion page and all the child pages will now be available to the Suptsk integration.
Done.
The user can select to continue having the ticket open, or close it.


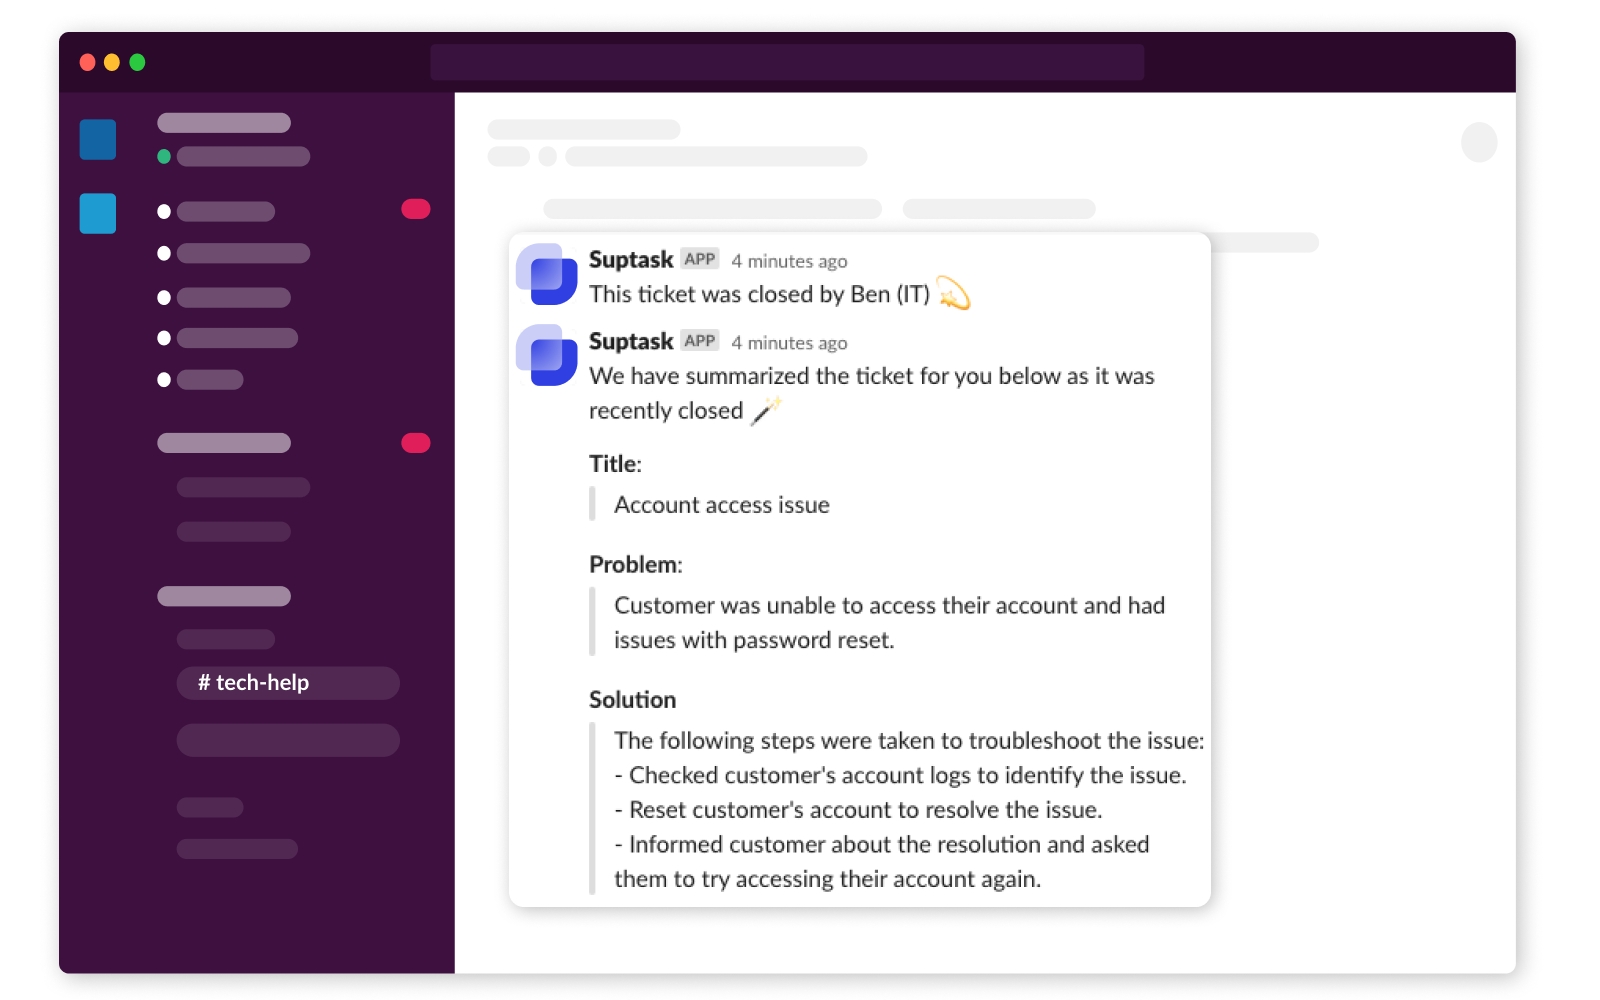
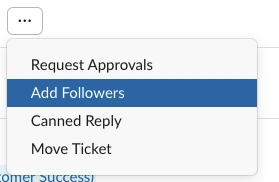
X
Access to tickets in the assigned Inboxes
X
Manage and respond to tickets in the assigned Inboxes
X
Manage Inboxes & Forms
X
Account Settings
X
Subscription & Billing
X
X
Submit and view their own tickets
X
X
X
X
Account-wide statistics on the Dashboard
X
View statistics of the assigned Inboxes from the Dashboard
Go to your form’s “Email Notifications” in the forms settings
Enable “Self email notification.”
The From email field needs to be the same email that you have enabled with the Suptask email integration
Set the recipient email to:
Include the email field in the notification settings so you can use it in Suptask to populate the requester’s email.
Ensure your Suptask workspace has email integration enabled. If it’s not enabled yet, reach out to your Suptask admin or contact support.
The requester will receive replies back via the set email


External Connections is often used to support customers and other organizations via shared channels.
Here follows a set of best practices to use Suptask with External Connections:
Your customer's users will only have access to the tickets submitted in the channels they are invited to.
You can set up Suptask to support your users in External Connections channels, when you add them as External Connections in Slack.
Any requests from users in these channels can be submitted as a ticket using Suptask, making it easy for both users and Agents to overview and track all requests.
Suptask only need to be installed and configured on the Workspace which is managing the channels and inviting all the members. Invited workspaces do not need to install Suptask.
You can use any Inbox for External Connections channels and configure your Form to receive tickets from channel(s).
Open your Inbox and create a new Form
Set up your Form with any type that empowers External Ticketing, such as Collaborative ticketing.
When configuring the Form, select the channels where the Form should be enabled.
This should be your customer channels e.g #ext-customer-a, #ext-customer-b
Invite Suptask App to the channels where you want to enable ticketing.
Optionally customize to improve the experience for your end-users
Such as controlling if agent control buttons should be visible in the channel.
External ticketing is now ready in the selected channels for your customers.
Your customers can now submit tickets with Suptask in these channels.
Learn more how to configure Forms:
Slack workspaces that are invited as an External Connection to a channel will be the users submitting tickets, such as your customers & clients.
Suptask have built a unique solution for your users in External Connections channels, that allow them to get access to the Suptask app without having to install it.
This enables them to track and overview their tickets using the Suptask App.
Tickets are submitted and available in the shared channel with the customer.
Customers can easily track and overview all their ticket requests in the Suptask app that will be visible in the left-side menu in Slack automatically.
Your customers and clients will never miss out on their tickets, as Suptask will automatically send summary notifications to them with their current active tickets.
Customers and Agents can submit tickets in External Connections channels from any message sent in the channel.
They can use any of the following ticket submission methods:
All tickets submitted in the channel are available to the users that are invited in the channel.
User A and User B is in the same channel #ext-channel-X where User A submits a ticket.
User B will also be able to track and follow this ticket.
The users you are inviting will automatically recveive automatic onboarding & training content from Suptask, making it easy to onboard users at scale.
External Connections is suited for sharing single channels, while Suptask's Multiple Workspace support is suited for connect several Slack Workspaces together for ticketing.
If you require users from other Slack Workspaces to act as Agents, we recommend you to invite any user who are an Agent to become a Guest user in your Slack Workspace in order to get the full & proper access to the Suptask App.
Move your mouse over the desired message to create a ticket from.
Press on the three dots within the context action menu to the right. See example screenshot below.
Select Create a ticket (Suptask) If you do not see this option, select More message shortcuts... to list additional shortcuts.
Suptask will guide you through the process of creating the ticket.
Done!
Suptask can submit a ticket from an existing message by adding the ticket 🎫 reaction emoji on top of the message.
On a sent message, add a reaction emoji by hovering over the message to display the small section with action icons in it.
Select the ticket 🎫 reaction emoji (:ticket: 🎫)
Suptask will automatically identify this emoji as the trigger to create a new ticket
Suptask will guide you through the process of creating the ticket.
In a channel or group chat you will need to invite the Suptask App to the channel .
In a Direct Messages (DM) you might need to give Suptask extended permissions.
Done!
Type /suptask, /request, /helpdesk, /support or /ticket to initiate the ticket creation.
Select the Form you want to use when submitting your ticket
Fill in the form fields and submit the ticket.
Done! Your ticket has been created
Open the Suptask App in Slack from the left-side menu
Search for "Suptask" in Slack if you can not find it in the left-side menu.
Click on the Create a new ticket action button.
Select where you want to create the ticket and to with what Form.
Fill in the form fields and submit the ticket.
Done
You can create tickets in Direct Messages (DM) using several creation methods from Suptask.
In order to use the ticket 🎫 reaction emoji to create tickets from messages in Direct Messages (DM), you might need to grant Suptask extended permissions.
Each user can grant these permissions by navigating here and it is only required once.
The Email-to-Slack ticketing integration allow users to submit tickets by sending an email, which is automatically converted to a reply inside of the ticket thread in Slack.
To submit a ticket via email, simply send an email to the email address you have configured for the Email-to-Slack integration.
Automatic ticket creation enables every message in a channel to be submitted as a ticket automatically.
Post a message in the channel where the automatic ticket creation have been enabled and Suptask will automatically submit the ticket while the message will be populated into the Description field.
Make sure that the Suptask App is invited to the channel or group that you are in. You can confirm this by writing the following message in Slack:
/invite @Suptask
Here are other useful articles to enhance your ticketing experience with Suptask.
Top 25 Organizations - Interactive dashboard to drilldown into Organizations
Top 25 Requesters - Interactive dashboard to drilldown into Requesters
Every dashboard can be filtered to further drilldown into your ticketing data. The filters are automatically applied to all the visibile widgets unless stated differently in the widget.
All filters can be combined, and each filter can have multiple values to achieve highest flexibility.
The filters available:
Inbox Responder channel The Responder channel connected to the Inbox which the ticket belongs to.
Form The Form which the ticket was submitted with.
Assignee The Assigned Agent on the ticket.
The dashboard includes multiple widgets that makes it possible to overview different dimensions of the ticketing process.
Here are a set of examples on the widgets that are available on the Dashboard:
Created & Closed tickets - Tickets that are moved to a Closed status.
Active tickets - Tickets that are created and being worked on in the various statuses.
Mean time to first reply - The mean time it takes to give the first reply on tickets.
Mean time to resolution - The mean time it takes to resolve tickets.
Top 10 assignees - Assignees who handles the most tickets.
Top 10 requesters - The users who submits the most tickets.
Top 10 Organizations - The organizations (such as departments, teams or customers) who submits the most tickets.
Use the date and time selector at the top of the Dashboard to select what timespan to look at across all the widgets.
This allow you to both filter on relative timespans, as well as absolute timespans.
Interactive dashboards empowers you to click on widget elements to further drilldown into the data. This can help you to identify tickets from specific data dimensions in widgets, which will automatically be filtered out as you interactively click to look closer into the data.
Top 25 Organizations
Top 25 Requesters
CSAT
Every widget can have its data exported to a number of file formats including CSV, Excel and JSON.
You can export data for the widget by pressing on the "..." action button icon in the top right corner of the widget:
You can have Custom Dashboards that can contain any metric, dimension of data or widget that you would like to have.
The Custom Dashboards are set up by Suptask Support and built together based on Your requirements.
Custom Dashboard will be visible in the list of dashboards when they are available on the account.
To overview, filter and view the detailed data across your tickets, use the Tickets Web overview:


Learn more about Inboxes and how they can be used in Suptask
Suptask offers a flexible ticketing system through Inboxes, Forms, and Fields, allowing it to adapt to various use cases and requirements for a seamless ticketing experience in Slack.
Inboxes is commonly structured per team but can help with several use cases:
Group tickets for a single team One Inbox for each of your team: IT, HR and one for Engineering
Categorize different specializations One Inbox for IT Security requests and another Inbox for all other IT related requests.
Top-level category with your Forms as sub-category One Inbox for Cloud - AWS and another Inbox for Cloud - Azure. In each Inbox you can have specific Forms to further categorize the request, for example AWS - S3 access
The initial set up of Suptask includes a default Inbox based on your use case.
Follow these steps to set up a new Inbox:
Navigate to in your Suptask account
Press on the New Inbox action button
The New Inbox wizard will guide you through the setup
Select one of the predefined names or enter a name of the new Inbox
Agents and Users can optionally work in the same channel where tickets are submitted.
Learn more:
To edit the display name or delete an Inbox, head over to where you can manage each inbox:
Access to an Inbox is controlled by the Responder channel.
Inboxes allow you to manage access to tickets for your Agents. Tickets submitted using a ticket Form for a certain Inbox will only be available for the Agents belonging to that Inbox.
Open the Responder channel in Slack that is connected to your Inbox
Invite the user to be a member of the channel
E.g to invite the user Ben in a channel, type: /invite @Ben
The user will receive Agent permissions as soon as the user is a member of the Responder channel
Open the Responder channel in Slack that is connected to your Inbox
Remove the user from the channel
E.g to remove the user Ben in a channel, type: /remove @Ben
The user will automatically be removed from the Inbox and lose its Agent permissions
You can setup an Inbox for each team that you want to enable Suptask ticketing for. Each team will only have access to the tickets submitted to their Inbox.
The users who are invited to the Responder channel will automatically become Agents of the connected Inboxes and be given access to the tickets in the Inbox.
For example:
The IT team uses the inbox IT with the connected Responder channel #IT-respond
The HR team uses the Inbox HR with the connected Responder channel #hr-respond
The HR team can not see nor access any of the submitted tickets which the IT team receives in their inbox, and vice verse.
You can have one or many Administrators of your Inbox, allowing these users to manage the Inbox and the Forms.
This allow you to scale Suptask smoothly across your teams by having team admins to manage their own team's ticket Forms and Inbox.
Follow these steps to set up an Inbox administrator:
Visit in your Account settings
Add the user as an Account admin to your Suptask account
Add the user to any existing Inbox that he should have access to by inviting the user to the Responder channel of the Inbox
This user is now an Agent and Admin of the Inbox
Multiple Inboxes can be used to help guide your users by using the Inboxes as a top-category and Forms as a sub-category.
This can be achieved by connecting multiple Inboxes to the same Responder channel.
An HR team can have several areas where they receive requests, and these can be setup with Inboxes and Forms.
The HR team will use the Responder channel #hr-team in Suptask. Each of these Inboxes will be connected to the same Responder channel, allowing the team of Agents to receive the tickets from all of the Inboxes.
Every Form can have Custom Fields to make sure the correct information is submitted with every request.
Inboxes can consist of multiple Forms that will help you route your tickets to your Inbox. Learn more about Forms to get you started.
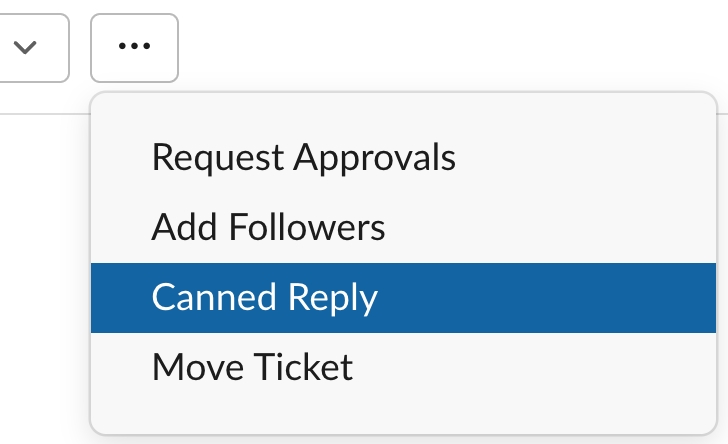
Each Form can be configured to be of a certain type that will allow different routing of tickets into your Inbox:
Private Ticket Submission Users in your Slack Workspace can submit tickets privately with this Form. The submitted ticket is only accessible to the user and the Agents in your Inbox. Common use case: Internal ticketing help desk
Collaborative Ticket Submission Members of the selected Slack channel(s) can submit tickets with this Form. The submitted ticket will be accessible for the users in the channel. Common use case: Internal and external ticketing
Auto Creation of Tickets in Slack Channels Automatically create tickets for every new message in a specified channel. Limited to one Form per channel, including having all Fields on the Form set as optional by default. Common use case: Internal and external ticketing
Email Ticketing into Slack Users create and reply on tickets by sending an email to an address of your choice. Agents can manage the tickets in Slack, where replies in Slack are automatically sent via email back to the users. Common use case: Internal and external ticketing
By having the flexibility of configuring the creation method per Form, you can ingest and route tickets from several different sources to your Inbox.
Connect the Inbox with a Responder channel
Select an existing channel or enter a name to create a new.
Optionally invite Agents to your new Inbox
Done!
It can sometimes take a few minutes before the promotion is applied in Suptask
It can sometimes take a few minutes before the change is applied in Suptask
Inbox:
HR - Talent Acquisition
HR - Onboarding
HR - Onboarding
Responder channel:
#hr-respond
#hr-respond
#hr-respond
Forms:
Talent Acquisition Operations
Pre-onboarding
Leadership development
Workforce Planning
LMS access
LMS access


The Responder channel is connected to your Inbox and is integrated in Slack as a private channel for your Agents.
It comes with several benefits:
Agents can leave private comments, search and manage their tickets directly in Slack.
Slack & Suptask will automatically send notifications about an updated or new ticket.
Users that are invited as a member to this channel will automatically become an Agent.
When a ticket is submitted with a Form, it is routed to the Inbox and will be visible inside of the connected Responder channel in Slack, where Agents receive a notification about the ticket and can start to respond to the ticket.
With the Suptask App, they see all tickets that are active and submitted in their channel(s).


Webhooks integration enables communication between Suptask tickets and other systems by sending automated HTTP requests when specific ticket events occur.
Use Cases:
Notify external systems about ticket updates, such as status changes or new replies.
Trigger workflows in external apps when tickets meet certain conditions.
Log ticket details in a custom system or analytics tool using webhook data.
Automate escalations by sending webhook requests to specialized tools for urgent issues.
API integration provides advanced customization and automation by enabling direct interaction between Suptask and any external platform.
Use Cases:
Build custom workflows to sync ticket data with external systems.
Enrich tickets with data fetched from external APIs, such as customer profiles or transaction records.
Automate repetitive tasks, like updating multiple systems.
Create Suptask tickets from external systems.
Slack Workflows integration leverages Slack's built-in automation tools to streamline ticketing processes, enabling rapid communication and action directly within Slack.
Slack Workflows offers a variety of integration possibilities. We have listed a set of examples below, but many more are available.
Use Cases:
Create tickets from Slack Workflows.
Notify people and groups across channels.
Trigger workflows via webhooks to integrate ticket creation into any app of your choice.
Receive tickets from online Web forms where your clients can submit the form to create a new tivcket request that you can manage in Slack.
Use Cases:
Receive ticket requests from an online Web form
Send automatic replies back via email to the requester.
Manage the received Web form submission in Slack via Suptask.
Google Sheets integration provides flexible tools for organizing ticket data, creating reports, and automating workflows. It enables centralized tracking and real-time updates, helping teams analyze ticket metrics with ease.
Use Cases:
Automatically log tickets and ticket information.
Generate charts and dashboards for monitoring and performance reporting.
Analyze ticket trends to optimize support processes.
GitHub integration bridges the gap between ticketing and development. Automatically sync ticket details with issues, track progress, and ensure seamless communication between support and engineering teams.
Use Cases:
Create GitHub issues directly from Suptask tickets.
Sync ticket status and information updates with GitHub issue.
Enrich tickets with issues and PR information for better context.
GitLab integration enhances collaboration for development-related tickets. Create issues directly from tickets and enrich ticket data.
Use Cases:
Trigger GitLab issue creation when tickets involve development tasks.
Notify teams about pipeline failures linked to specific tickets.
Enrich tickets with GitLab merge request links for traceability.
Jira integration aligns ticketing with agile project management, providing a seamless link between support and development. This ensures tickets needing engineering support are efficiently tracked and resolved.
Use Cases:
Automatically create Jira issues for tickets that need development work.
Sync ticket updates with Jira to keep teams up to date.
Enrich tickets with ticket details for broader project visibility.
Zendesk integration centralizes support operations by syncing ticket data with a robust helpdesk platform.
Use Cases:
Create tickets from Slack to Zendesk.
Sync ticket updates between Slack and Zendesk in real-time.
Automatically enrich Slack tickets with information from Zendesk.
With the Linear integration you can syncing tickets and updates between both systems.
Use Cases:
Automatically create Linear tasks.
Enrich tickets with Linear task details like priorities, statuses, or deadlines.
Sync ticket resolution updates with Linear task progress to maintain alignment.
Notify support teams in real-time when Linear tasks linked to tickets are completed.
ClickUp integration brings comprehensive task and project management to ticketing, enabling teams to link ticket actions with project timelines and priorities.
Use Cases:
Automatically create ClickUp tasks for tickets requiring additional input.
Enrich tickets with progress updates and deadlines from ClickUp.
Sync ticket priorities with ClickUp task boards for better visibility.
Notify team members about ticket-related changes directly within ClickUp.
PagerDuty integration connects incident management with ticketing workflows, providing real-time alerts and automated escalations for critical support issues.
Use Cases:
Automatically create PagerDuty incidents when high-priority tickets are created.
Enrich tickets with PagerDuty response team data and incident timelines.
Sync ticket updates with PagerDuty resolution statuses to ensure accurate tracking.
Automate escalations to appropriate team members based on ticket severity.
Intercom integration links customer communication with ticketing to provide context-driven support and proactive resolution strategies.
Use Cases:
Create tickets from intercom conversations.
Enrich tickets with customer information and conversations.
Automate ticket updates to customers directly through Intercom.
Salesforce integration strengthens customer insights by linking CRM data with ticketing. This allows teams to deliver more personalized support and automate follow-ups for better relationship management.
Use Cases:
Enrich tickets with customer details like CRM data.
Create tickets from Slack conversations in to Salesforce.
Sync ticket updates bi-directionally to keep teams up to date.
HubSpot integration connects support and sales workflows, allowing for seamless transitions between resolving issues and maintaining customer relationships. It ensures a complete view of customer interactions.
Use Cases:
Enrich tickets with HubSpot data, such as CRM data.
Create tickets from Slack conversations in to Salesforce.
Sync ticket updates bi-directionally to keep teams up to date.
Notion integration simplifies knowledge sharing by linking ticketing with collaborative documentation. It ensures teams have quick access to resources for faster issue resolution.
Use Cases:
Maintain a dynamic knowledge base of ticket resolutions.
Enrich tickets with knowledge stored in Notion.
Track and keep tasks updated between systems.
Suggest knowledge base articles based on ticket request.
WhatsApp integration enables you to send and receive messages in Slack to a WhatsApp party. Making it possible to support clients with WhatsApp via Slack.
Use Cases:
Send WhatsApp messages from tickets in Slack.
Receive WhatsApp message to Slack.
Centralize management of WhatsApp messages.
Airtable integration turns ticketing into a visual database for dynamic tracking and analysis. It’s particularly useful for collaborative teams needing customizable workflows.
Use Cases:
Log detailed ticket information for data-driven decision-making.
Enrich tickets with linked records from Airtable, such as customer preferences.
Create shared views of tickets for specific teams or stakeholders.
Trello integration links tickets with Kanban-style boards, enabling visual tracking of support workflows and progress.
Use Cases:
Create Trello cards for new tickets to streamline task management.
Automate movement of cards across boards as tickets progress.
Enrich tickets with Trello checklist items for detailed tracking.
Freshdesk integration connects ticketing with customer service workflows, providing teams with tools for better response management.
Use Cases:
Automatically create tickets in Freshdesk from Slack.
Enrich tickets with Freshdesk to Suptask.
Sync ticket information bi-directionally between the platforms.
Twilio integration enhances communication by enabling automated SMS or voice notifications tied to ticket events. It’s ideal for customer updates, escalation alerts, and personalized support interactions. Use Cases:
Notify customers of ticket status changes via SMS.
Send escalation alerts to managers or teams for high-priority tickets.
Use voice notifications for critical incident updates to ensure rapid response.
Shopify integration connects ticketing with e-commerce operations, providing valuable customer and order context directly within tickets.
Use Cases:
Enrich tickets with Shopify order history, fulfillment status, and customer details.
Notify team members when refunds or cancellations are processed.
Trigger workflows for abandoned cart recovery or promotional offers based on ticket context.
ServiceNow integration enables seamless IT service management by connecting ticketing with ServiceNow's incident tracking and workflow automation capabilities.
Use Cases:
Create ServiceNow incidents and tickets.
Enrich tickets with ServiceNow incident updates, resolutions, or related tasks.
Sync ticket data between ServiceNow and Slack for consistent records.
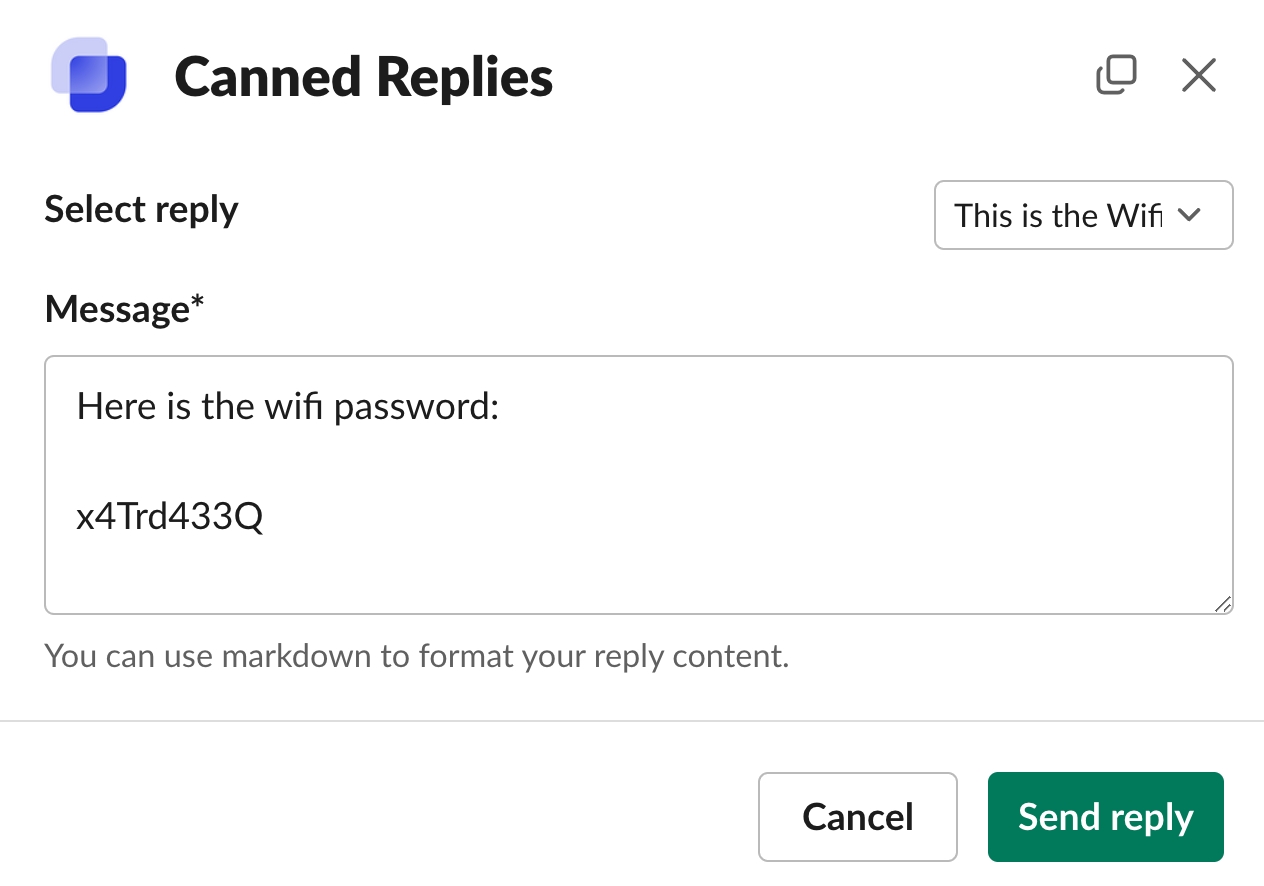
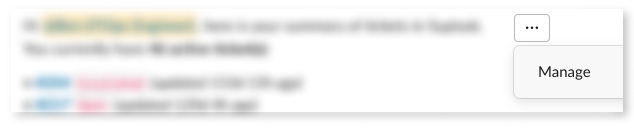
Created Ticket
Updated Ticket
New Reply/Comment on a Ticket
You can find sample data below with the current structure of the WebHook request.
{
"ticket": {
"ticketNumber": "42",
"teamTicketId": "zenithops-42",
"followers": {},
"teamName": "Zenith Corp",
"queueId": "a73ee310-c1fe-4abc-9374-82d8d123a9fc",
"formId": "f71dd3b1-6f43-4f1f-a832-d1bd4c7ed9b7",
"messageResponderId": "2850112358.998112",
"status": "OPEN",
"messageRequesterId": "2850048932.761432",
"updatedBy": "U01XZGTRPL8",
"messageResponderCount": 0,
"teamId": "T02ZXY1B2MN",
"createdBy": "U01XZGTRPL8",
"requesterId": "U01MLKU9XZB",
"isCollaborationTicket": false,
"archived": false,
"messageLastRequesterTime": 2850112357,
"id": "b2e41bde-78c2-4c09-bf6d-0b37a12e50fc",
"isSlackConnect": false,
"tags": [],
"messageLastRespondTime": 2850112357,
"teamDomain": "zenithops",
"__typename": "Ticket",
"requesterTicketPermalink": "https://zenithops.slack.com/archives/C09JH1RMXTY/p2850048932761432?thread_ts=2850036102.054312&cid=C09JH1RMXTY",
"messageRequesterCount": 0,
"assignee": "UNASSIGNED",
"responderTicketPermalink": "https://zenithops.slack.com/archives/C09JK2D3JQZ/p2850112358998112",
"createdAt": 2850112357,
"attachments": [],
"messageRequesterChannel": "C09JH1RMXTY",
"source": "slack",
"formValues": [
{
"value": "Review the new AI models submitted yesterday",
"fieldName": "description"
},
{
"value": "Deeplogix",
"fieldName": "organization"
},
{
"value": "OPEN",
"fieldName": "status"
}
],
"summaryTitle": null,
"messageResponderChannel": "C09JK2D3JQZ",
"messages": [],
"updatedAt": 2850112357,
"summarySolution": null,
"summaryProblem": null,
"description": "Review the new AI models submitted yesterday",
"approvers": {}
},
"displayFields": {
"assignees": [],
"requester": [
{
"id": "U01MLKU9XZB",
"displayName": "Jordan Mendes"
}
],
"descriptionUserMap": {},
"organization": "Deeplogix"
}
}{
"ticket": {
"ticketNumber": "847",
"teamTicketId": "zenith-847",
"followers": {},
"teamName": "Zenith Corp",
"queueId": "c9edab55-a3f1-4abc-b834-9f78e3cd0e4a",
"formId": "9f42db38-3f45-41f7-b123-972f3d6542c1",
"messageResponderId": "2847392847.184739",
"status": "CLOSED",
"messageRequesterId": "2847392846.984321",
"updatedBy": "U01XZGTRPL8",
"messageResponderCount": 1,
"teamId": "T02ZXY1B2MN",
"createdBy": "U01XZGTRPL8",
"closedDate": "2025-06-11T13:45:20.001Z",
"extTicketRef": [
"T02ZXY1B2MN-992384"
],
"requesterId": "U01XZGTRPL8",
"responderThreadPermalink": "https://zenithops.slack.com/archives/C09JK2D3JQZ/p2847392847184739?thread_ts=2847392847.184739&cid=C09JK2D3JQZ",
"isCollaborationTicket": false,
"archived": false,
"messageLastRequesterTime": 2847392848,
"id": "bb45d113-09a1-4ff9-b372-6e45b971ccf8",
"isSlackConnect": false,
"tags": ["question"],
"messageLastRespondTime": 2847392859,
"teamDomain": "zenithops",
"__typename": "Ticket",
"requesterActionTs": "2847392848.284392",
"requesterTicketPermalink": "https://zenithops.slack.com/archives/C09JH1RMXTY/p2847392846984321",
"requesterThreadPermalink": "https://zenithops.slack.com/archives/C09JH1RMXTY/p2847392847284392?thread_ts=2847392846.984321&cid=C09JH1RMXTY",
"messageRequesterCount": 1,
"assignee": "U06YTRAB1VZ",
"responderTicketPermalink": "https://zenithops.slack.com/archives/C09JK2D3JQZ/p2847392847184739",
"createdAt": 2847392846,
"attachments": [],
"messageRequesterChannel": "C09JH1RMXTY",
"source": "slack",
"formValues": [
{
"value": "UNASSIGNED",
"fieldName": "assignee"
},
{
"value": "CRITICAL",
"fieldName": "priority"
}
],
"summaryTitle": null,
"messageResponderChannel": "C09JK2D3JQZ",
"messages": [
{
"responderTs": [
"2847392847.658329"
],
"initiator": "REQUESTER",
"requesterTs": [
"2847392846.984321"
]
},
{
"responderTs": [
"2847392858.213847"
],
"initiator": "RESPONDER",
"requesterTs": [
"2847392859.102938"
]
}
],
"updatedAt": 2847392875,
"summarySolution": null,
"summaryProblem": null,
"description": "Hi, I need help with my laptop",
"approvers": {}
},
"displayFields": {
"assignees": [
{
"id": "U06YTRAB1VZ",
"displayName": "andrea"
}
],
"requester": [
{
"id": "U01XZGTRPL8",
"displayName": "Customer Care"
}
],
"descriptionUserMap": {},
"organization": null,
"firstReplyTime": "2025-06-11T13:42:31.000Z"
}
}
{
"ticket": {
"ticketNumber": "5931",
"teamTicketId": "zenithops-5931",
"followers": {},
"teamName": "Zenith Operations",
"queueId": "c8feab11-f7c2-40df-8421-df32e6030e9b",
"formId": "8732af22-a1cd-4c65-a113-b732ae47e2f4",
"messageResponderId": "2850193845.103847",
"status": "IN_PROGRESS",
"messageRequesterId": "2850193844.928374",
"updatedBy": "U01XZGTRPL8",
"messageResponderCount": 0,
"teamId": "T02ZXY1B2MN",
"createdBy": "U01XZGTRPL8",
"extTicketRef": [
"T02ZXY1B2MN-883421"
],
"requesterId": "U01XZGTRPL8",
"responderThreadPermalink": "https://zenithops.slack.com/archives/C09JK2D3JQZ/p2850193845103847?thread_ts=2850193845.103847&cid=C09JK2D3JQZ",
"isCollaborationTicket": false,
"archived": false,
"messageLastRequesterTime": 2850193846,
"id": "a9b6c003-25e1-4f79-8d83-108fb321fa2d",
"isSlackConnect": false,
"tags": [],
"messageLastRespondTime": 2850193844,
"teamDomain": "zenithops",
"__typename": "Ticket",
"requesterActionTs": "2850193846.204981",
"requesterTicketPermalink": "https://zenithops.slack.com/archives/C09JH1RMXTY/p2850193844928374",
"requesterThreadPermalink": "https://zenithops.slack.com/archives/C09JH1RMXTY/p2850193846204981?thread_ts=2850193844.928374&cid=C09JH1RMXTY",
"messageRequesterCount": 1,
"assignee": "UNASSIGNED",
"responderTicketPermalink": "https://zenithops.slack.com/archives/C09JK2D3JQZ/p2850193845103847",
"createdAt": 2850193844,
"attachments": [],
"messageRequesterChannel": "C09JH1RMXTY",
"source": "slack",
"formValues": [
{
"value": "UNASSIGNED",
"fieldName": "assignee"
},
{
"value": "MEDIUM",
"fieldName": "priority"
}
],
"summaryTitle": null,
"messageResponderChannel": "C09JK2D3JQZ",
"messages": [
{
"responderTs": [
"2850193845.748392"
],
"initiator": "REQUESTER",
"requesterTs": [
"2850193844.928374"
]
}
],
"updatedAt": 2850193848,
"summarySolution": null,
"summaryProblem": null,
"description": "Can you help me with the access to the new service?",
"approvers": {}
},
"externalTickets": [
{
"external": {
"ticketId": "883421",
"url": "zenithops.zendesk.com/agent/tickets/883421"
},
"version": 2,
"modified": "2025-06-11T13:43:01.214Z",
"object": {
"link": "https://zenithops.zendesk.com/agent/tickets/883421"
},
"suptask": {
"type": "Zendesk",
"teamId": "T02ZXY1B2MN"
},
"created": "2025-06-11T13:43:01.214Z",
"teamId": "T02ZXY1B2MN",
"suptaskTicketId": "a9b6c003-25e1-4f79-8d83-108fb321fa2d",
"id": "T02ZXY1B2MN-883421",
"entity": "ExternalTicket"
}
],
"user": {
"id": "U06YTRAB1VZ",
"name": "andrea",
"email": "[email protected]"
},
"text": "_Synced from Suptask_\n\nandrea:\nHola",
"rawText": "Hola",
"dispatchedFrom": "responder"
}Learn how to make use of Suptask in Slack Workflows
The integration with Slack Workflows is included in the Professional plan of Suptask.
Slack Workflows allow you to build a multi-step workflow that combines different inputs and actions. Suptask supports the new Slack Workflows and opens up the possibility to integrate Suptask as a part of Slack Workflows.
Trigger workflow from an event in Suptask
Create tickets in Suptask from a workflow
You need to have a paid subscription of Slack to have access to Slack Workflows.
Suptask can work with Slack Workflows in mainly two different ways:
Suptask can trigger a Slack Workflow using the Webhook event.
Tickets can be created in Suptask from a Slack Workflow via a message in a channel.
Create a new Slack Workflow
Select the event on how to start the workflow:
Set up the data variables that you want to map from Suptask to the Workflow
You can find the sample Webhook data below
In the new Automation rule...
Select what Inbox, and optionally what Form to use the Automation rule for
Define the trigger event e.g New ticket created
Set up the optional conditions
Select the Webhook action
The Slack Workflow will now be executed by Suptask whenever the Automation rule is triggered.
You can now automatically create and pre-fill tickets directly from Slack workflow messages - no manual data entry required.
With the automatic message-to-form mapping, any structured data included in a Slack workflow message can be detected, extracted, and mapped into your ticket form fields. This helps your team capture consistent, structured information right from Slack, even when users type messages manually.
Before setting up this integration, make sure to create a dedicated private channel where your Slack Workflow can post messages. Suptask will use this channel to convert the messages to tickets.
Open your Inbox in Suptask
Create a new Form
Select the Form type: Auto Creation of Tickets in a Slack Channel
Open your Slack Workflow
As the last step, add the Message > Send message to a channel
Select the same channel as the Form in Suptask
Add the relevant information to the message field.
When your team posts a Slack workflow message in a connected channel, Suptask analysis the message for field markers - small snippets of text that identify specific ticket fields and their values.
For example:
When this message is converted into a ticket:
The priority, status, and assignee fields are automatically filled.
The message text remains intact for your description.
Result:
Description: “New incident reported. Server outage detected.”
Fields: priority = High, status = New, assignee = U123456789
You can use three simple syntaxes to include field data. All three work the same way - use whichever fits your team’s preference.
You can even mix them in the same message:
The parser automatically matches extracted fields to your ticket form fields. It supports both system fields (like priority, status, assignee, and tags) and custom fields.
Case-insensitive - <<PRIORITY: high>> = <<priority: High>>
Whitespace-tolerant - # assignee = U123456789 works fine
Supports multiple values for multi-select fields like tags
If a value doesn’t match an available option (e.g., <<priority: Pizza>>), it’s simply ignored.
If the same field appears more than once, the last one wins:
To include syntax symbols inside a description, prefix them with a backslash:
Comma-separated values automatically populate multi-select fields:
Field values must match known options (e.g., High, Medium, Low).
Here’s how it might look in a Slack workflow message step:
When the message posts in your Slack channel, the parser automatically extracts these values and creates a fully populated ticket in your system.
Be consistent use the same syntax style across your workflows.
Validate field names - they must match the names or labels in your form.
Use Slack workflow variables inside field markers for dynamic values:
Avoid empty values - <<priority: >>
How to create
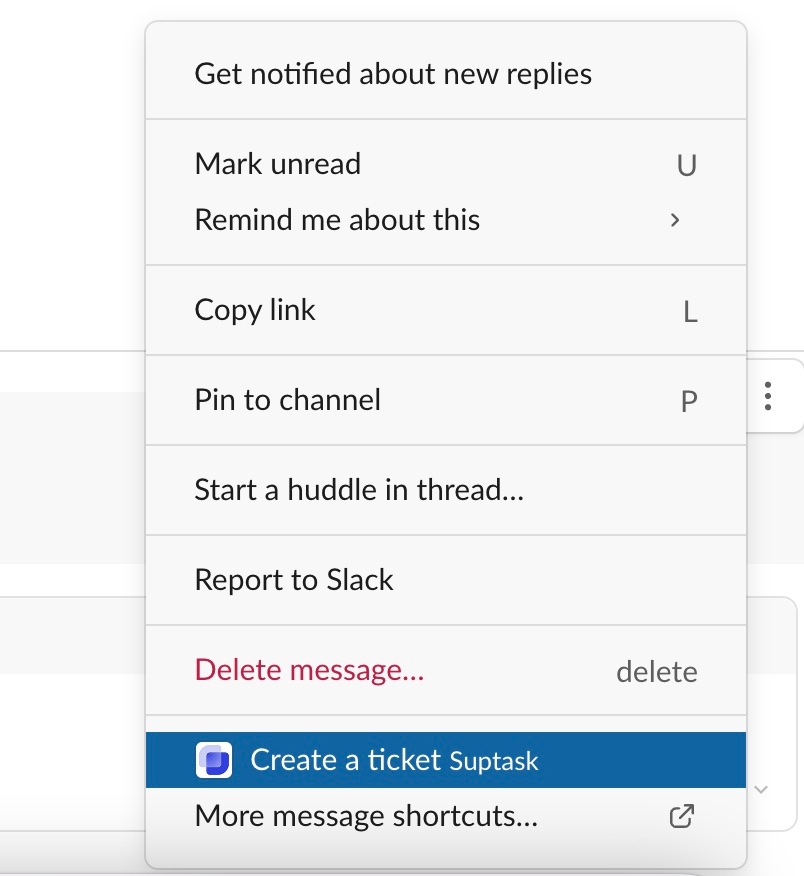
Use the Authorization header with the value Api-Token <your-token>. The token is assigned to a user.
A detailed description of the ticket.
User has lost access to his account.The priority of the ticket.
CRITICALThe current status of the ticket.
OpenThe user Slack member ID assigned to the ticket.
U132FRJPTERThe requester Slack member ID of the ticket.
U073PBJPHGWOne of the Slack channel IDs which are assigned to form.
C012K1Y23L4Tags associated with the ticket.
bugIdentifier UUID for the form used to submit the ticket. Fetched from the Web url when editing a form.
96d140f8-bd0f-4b46-a115-c19e090bb79cTicket successfully created
Invalid request payload
Ticket not found
Server error
Rate limit information is returned in response headers (X-RateLimit-Limit, X-RateLimit-Remaining, X-RateLimit-Reset).
Use the Authorization header with the value Bearer <jwt-token>. The JWT token contains user and team information.
The numeric ticket number (e.g., 2075).
2075Ticket successfully retrieved
Invalid ticket number (must be numeric)
Unauthorized - Invalid or missing authentication token
Access denied - Ticket belongs to a different team
Ticket not found
Too many requests - Rate limit exceeded
Server error
Use the Authorization header with the value Api-Token <your-token>. The token is assigned to a user.
The UUID of the ticket to delete.
758e6b65-b4ec-4a03-a15a-9d44ac88e093Ticket successfully deleted
No content
Ticket not found
Server error
No content
Use the Authorization header with the value Api-Token <your-token>. The token is assigned to a user.
The unique ID of the ticket to update.
Ticket successfully updated
No content
Invalid request payload
Ticket not found
Server error
No content
Use the Authorization header with the value Api-Token <your-token>. The token is assigned to a user.
The unique UUID of the Suptask ticket to associate with an external ticket.
The ID of the external ticket.
EXT-123The type of integration (e.g., "Jira", "Zendesk").
JiraThe URL of the external ticket.
https://jira.example.com/browse/EXT-123External ticket successfully associated
Invalid request payload
Ticket not found
Server error
Use the Authorization header with the value Api-Token <your-token>. The token is assigned to a user.
The unique UUID of the Suptask ticket.
The reply message text
We are working on your ticket.The displayed username of the reply text.
Greg McDonaldSelect between Requester (public reply) and/or Responder (internal comment reply) channel.
["requester", "responder"]Returns
Invalid request payload
Suptask ticket not found
Server error
Store the Webhook URL, you will need it in the Suptask setup.
Save your workflow.
Save the new rule.
Configure the Form to Accept tickets in the newly created channel
e.g #auto-create
Save the Form and make sure it is published in Slack.
Save your workflow.
<<requesterId: U934212312>>
requester = Ann
Slack user ID from Ann
Test your syntax - you can preview how fields are parsed before enabling automation.
Angle Brackets
<<priority: High>>
Sets the “priority” field to High
Square Brackets
[[status: In Progress]]
Sets the “status” field to In Progress
Hash Syntax
#assignee=U123456789
Assigns the ticket to the user ID provided
<<priority: High>>
priority = HIGH
Standard field
[[status: Open]]
status = OPEN
Case-insensitive
#tags=network, urgent
tags = [“network”, “urgent”]
Multi-value
<<assigneeId: U123456789>>
assignee = Bob
Slack user ID from Bob
Field not showing up
Misspelled or unknown field name
Check your form field names
Wrong value applied
Conflicting markers
Last one wins — review your message order
Value ignored
Invalid or empty field
Make sure it matches valid form options
Partial extraction
Missing colon or equals sign

Use the correct syntax pattern
POST /ticket HTTP/1.1
Host:
Authorization: YOUR_API_KEY
Content-Type: application/json
Accept: */*
Content-Length: 338
{
"description": "User has lost access to his account.",
"priority": "CRITICAL",
"status": "Open",
"assignee": "U132FRJPTER",
"requester": "U073PBJPHGW",
"customFields": [
{
"fieldId": "9682a666-b6b2-4f5e-833d-cb4430799317",
"value": "High Business Impact"
}
],
"requesterChannel": "C012K1Y23L4",
"tags": [
"bug"
],
"formId": "96d140f8-bd0f-4b46-a115-c19e090bb79c"
}{
"ticketId": "758e6b65-b4ec-4a03-a15a-9d44ac88e093"
}GET /ticket/{ticketNumber} HTTP/1.1
Host:
Authorization: Bearer YOUR_SECRET_TOKEN
Accept: */*
{
"id": "758e6b65-b4ec-4a03-a15a-9d44ac88e093",
"ticketNumber": 2075,
"teamId": "T01234ABCDE",
"queueId": "6f8d19d9-f181-4688-9926-5278cb824b3c",
"formId": "96d140f8-bd0f-4b46-a115-c19e090bb79c",
"status": "Open",
"priority": "CRITICAL",
"description": "User has lost access to his account.",
"assignee": "U132FRJPTER",
"requesterId": "U073PBJPHGW",
"requester": "John Doe",
"tags": [
"bug",
"urgent"
],
"customFields": [
{
"fieldName": "Impact",
"value": "High Business Impact"
},
{
"fieldName": "Department",
"value": "Engineering"
}
],
"createdAt": "2025-10-15T10:30:00.000Z",
"updatedAt": "2025-10-28T08:45:00.000Z",
"closedDate": null,
"organization": "Acme Corp",
"source": "slack",
"archived": false,
"messageRequesterChannel": "C012K1Y23L4",
"messageResponderChannel": "C023K4Y75L6",
"responderThreadPermalink": "https://workspace.slack.com/archives/C023K4Y75L6/p1234567890",
"requesterThreadPermalink": "https://workspace.slack.com/archives/C012K1Y23L4/p1234567890",
"summaryTitle": "Account Access Issue",
"summaryProblem": "User unable to log in to account",
"summarySolution": "Reset password and verified access",
"csatRating": 5,
"csatComment": "Great support, issue resolved quickly!",
"externalTicketRefs": [
"JIRA-123"
]
}DELETE /ticket/{ticketId} HTTP/1.1
Host:
Authorization: YOUR_API_KEY
Accept: */*
PATCH /ticket/{ticketId} HTTP/1.1
Host:
Authorization: YOUR_API_KEY
Content-Type: application/json
Accept: */*
Content-Length: 276
{
"description": "Updated issue details.",
"priority": "Medium",
"status": "Closed",
"assignee": "U132FRJPTER",
"requester": "U073PBJPHGW",
"customFields": [
{
"fieldId": "9682a666-b6b2-4f5e-833d-cb4430799317",
"value": "High Business Impact"
}
],
"requesterChannel": "C012K1Y23L4",
"tags": [
"bug"
]
}POST /ticket/external/{ticketId} HTTP/1.1
Host:
Authorization: YOUR_API_KEY
Content-Type: application/json
Accept: */*
Content-Length: 145
{
"externalId": "EXT-123",
"integrationType": "Jira",
"url": "https://jira.example.com/browse/EXT-123",
"data": {
"team_ref": "H34211",
"crm_id": "ID42298"
}
}{
"success": true,
"message": "External ticket associated successfully."
}POST /ticket/reply/{ticketId} HTTP/1.1
Host:
Authorization: YOUR_API_KEY
Content-Type: application/json
Accept: */*
Content-Length: 111
{
"text": "We are working on your ticket.",
"username": "Greg McDonald",
"channel": "[\"requester\", \"responder\"]"
}{
"success": true,
"message": "Reply message sent successfully"
}New incident reported. <<priority: High>> <<status: New>> <<assignee: U123456789>> Server outage detected.Server down! <<priority: Critical>> [[status: In Progress]] #assignee=U123456789<<priority: Low>> [[priority: Medium]] #priority=High
→ priority = High<<description: Error contains \<brackets\> and \#hashes>><<tags: server, network, critical>>Incident reported by {{user}} at {{timestamp}}.
<<priority: {{form_priority}}>>
[[status: New]]
#assignee={{form_assignee}}
<<tags: {{form_tags}}>>
Details: {{form_description}}<<priority: {{workflow.priority}}>> [[status: {{workflow.status}}]]