> For the complete documentation index, see [llms.txt](https://support.suptask.com/llms.txt). Markdown versions of documentation pages are available by appending `.md` to page URLs; this page is available as [Markdown](https://support.suptask.com/suptask-ai/auto-tag-and-prioritize.md).
# Auto-tag and prioritize
Categorize and prioritize incoming tickets before an agent picks them up
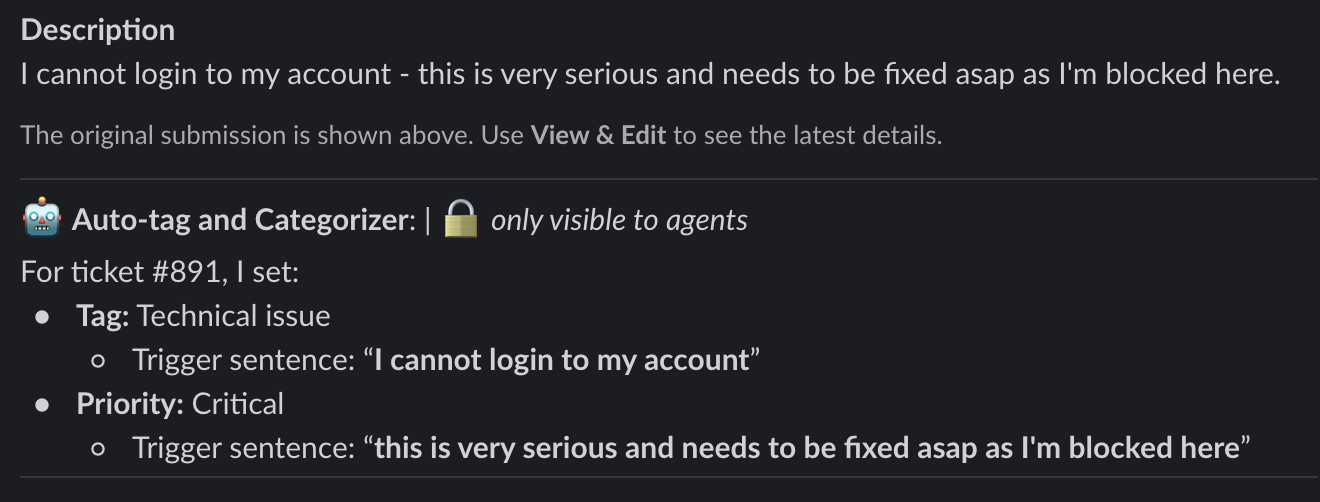
Tagging and prioritizing is the first thing an agent does on every new ticket, and the first thing that gets skipped when the queue is busy. With auto-tagging, an Assistant reads each incoming ticket, picks the closest Tag and Priority from your Form, and applies them - so tickets arrive in the queue already categorized, and your reports, filters and SLAs work from day one.
***
### How it works
Auto-tagging is one of the jobs an Assistant does on a ticket. When a ticket comes in, the Assistant:
1. Reads the ticket title, message/description and any filled-in fields.
2. Looks at which values your Form offers for **Tag** and **Priority**.
3. Applies the closest match to the ticket, and posts a short note to agents saying which sentence in the request led to that choice.
The Assistant only chooses from the values that already exist in your Form. It never invents a tag or a priority level, so the categories you report on stay the ones you defined.
***
### What it can set
Tag and Priority are the most common use, and the example below covers both. The same approach works for any field in your Form that has a fixed set of values, such as a category, team or product selection list.
| Field | Typical use |
| --------------------- | ---------------------------------------------------------------------------------------------- |
| **Tag** | Categorize the request - *VPN*, *Hardware*, *Access*, *Billing* - for filtering and reporting. |
| **Priority** | Rank urgency so agents work the right ticket first, and SLAs start with the correct threshold. |
| **Other list fields** | Any custom selection field where the right value can be read from the request itself. |
Tags and Priority are managed per Form. See Tags and Fields for how to set up the values the Assistant chooses from.
{% hint style="info" %}
The quality of the tagging depends on the quality of the list. Distinct, non-overlapping tag names give the Assistant a clear choice; five tags that all mean "access problem" do not.
{% endhint %}
***
### Instructions to use
This is the Assistant's base instructions. Paste them as they are and change the team name.
```
You are assessing tickets before they are handled by agents in the IT team.
Review what Tag and Priority field values are available in the form.
Apply the closest appropriate tag and priority - and say which sentence
in the ticket led you there.
```
The last line matters. Asking the Assistant to cite the sentence gives agents a one-line audit trail on every ticket, and makes it easy to spot when a tag name is misleading the Assistant.
To include another field, name it the same way: *"Review what Tag, Priority and Team values are available in the form."*
***
### Review or apply automatically
You decide whether a person confirms the choice:
* **Agent review** - the Assistant proposes the Tag and Priority and an agent approves before the ticket changes. Use this when you're starting out, or where a wrong priority has real cost.
* **Apply directly** - the Assistant sets the fields itself. Use this once you've seen it work on real tickets and the choices are consistently right.
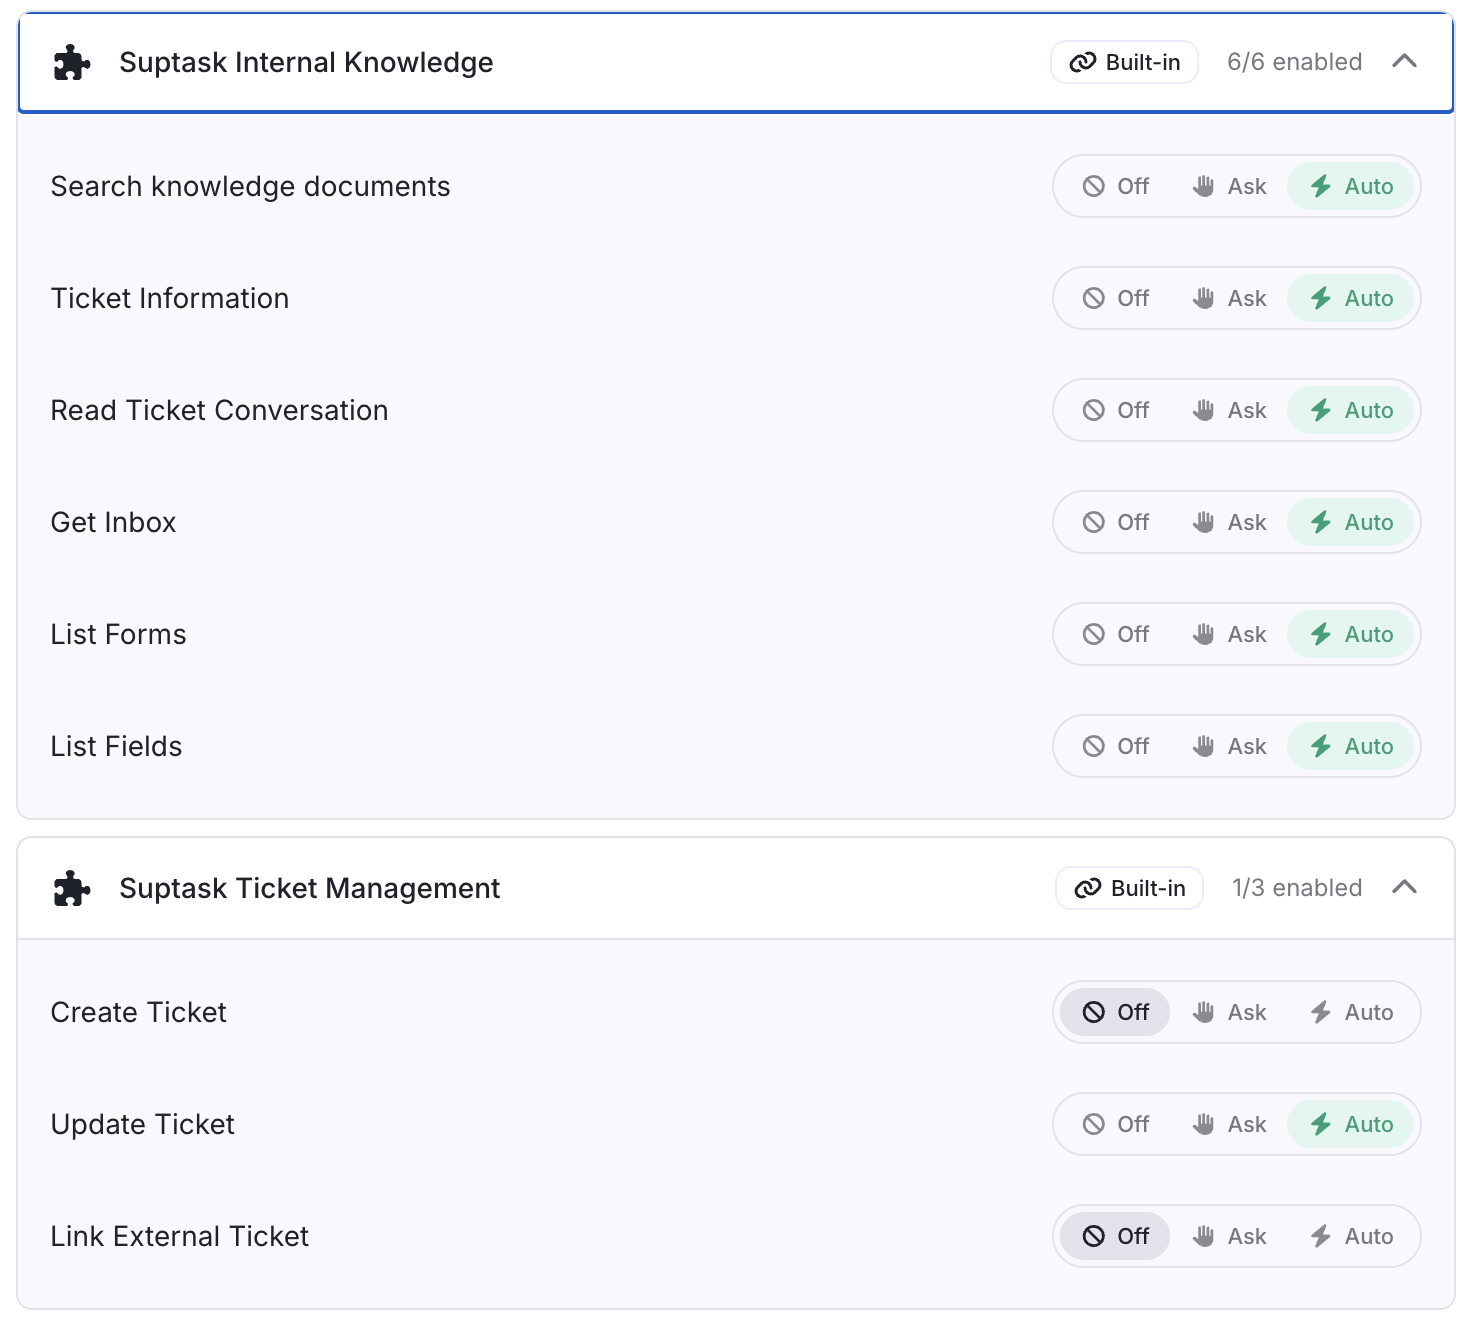
This is controlled by the mode on the tool that updates the ticket - **Ask** for agent review, **Auto** to apply directly. There is nothing to add to the instructions.
Agents can change any value the Assistant applied, in Slack or in the Web app, exactly as they would on any other ticket.
***
### Set it up
Auto-tagging is set up as an Assistant, per Inbox, in the Suptask Web app under **Intelligence**.
1. **Connectors** - enable the tool that updates ticket fields, and set it to **Ask** or **Auto**. The following connector permissions needs to be enabled as a minimum:
1. **Suptask**: Update ticket, Get Inbox, List Forms, List Fields, Ticket Information, Read Ticket Conversation
2. **Tasks & Personality** - name the Assistant and paste the instructions above as its base instructions.
3. **Activation** - trigger on **Ticket created**. Limit it to the Forms whose Tags and Priority you want applied.
4. **Review & Deploy** - check the summary and deploy.
Start with **Ask** on a single Form. Once agents are approving without edits, switch to **Auto** and widen it to more Forms.
{% hint style="info" %}
Auto-tagging combines well with Automations. Let the Assistant set the Tag, then let an automation rule assign or notify based on it.
{% endhint %}
***
### Related articles
{% content-ref url="/pages/tQOpvwLdPZx5VuIUQroq" %}
[Suptask AI](/suptask-ai/how-the-ai-assistant-works.md)
{% endcontent-ref %}
{% content-ref url="/pages/LytgedaqKMhfYKBQMnyQ" %}
[Auto-answer requests](/suptask-ai/auto-answer-requests.md)
{% endcontent-ref %}
{% content-ref url="/pages/TYHRNAg1Lm6ogFBUkiqc" %}
[Forms & Fields](/setup-and-configure/forms-and-fields.md)
{% endcontent-ref %}